

To choose a resin 3D printer for product development, begin with the parts you need to make rather than the printer specifications. Define the largest model, critical dimensions, surface requirements, material behavior, expected batch size and inspection method. Then evaluate whether the printer, resin, slicing process, support strategy, cleaning equipment and UV post-curing workflow can produce repeatable, usable parts.
Do not choose a machine only because it advertises high resolution, a large build volume or fast printing. The more useful question is whether the complete workflow can consistently support your design reviews, assembly tests, engineering samples and production trials.
Why Product Development Requires More Than a High-Resolution Printer
Resin 3D printing can help product-development teams turn digital models into physical samples without waiting for conventional tooling. Depending on the design and material, teams may use printed parts for:
- Appearance evaluation
- Ergonomic review
- Assembly and fit checking
- Design communication
- Engineering samples
- Transparent or detailed models
- Jigs, fixtures and checking tools
- Flexible structure evaluation
- Mold or casting patterns
- Limited production trials
However, these applications do not require the same printer or resin.
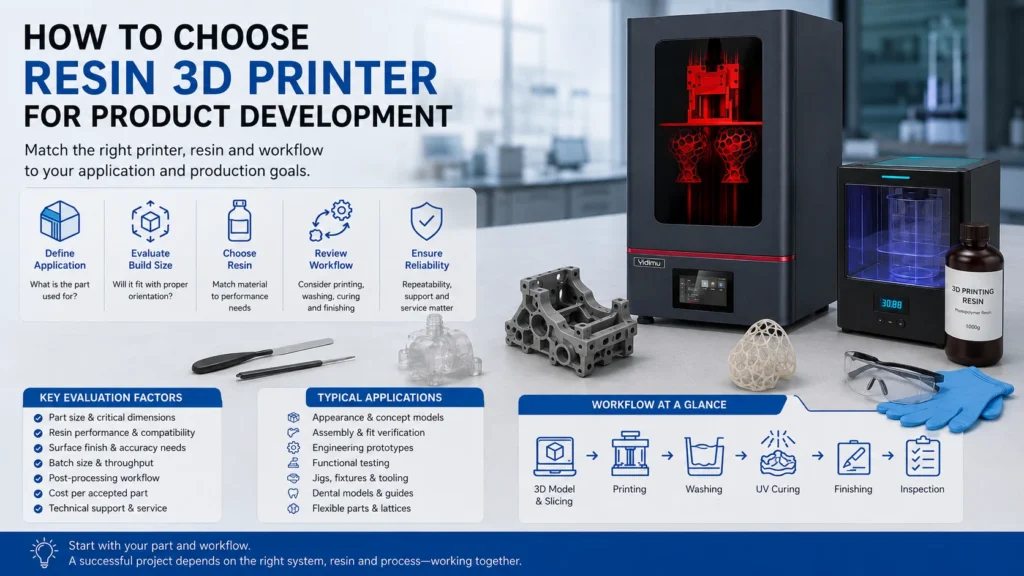
A display model may prioritize surface finish and fine details. An enclosure prototype may require dimensional stability and assembly fit. A flexible lattice may need controlled deformation and recovery. A fixture may require toughness, repeatability and resistance to handling.
This is why choosing a printer by specification sheet alone often leads to poor results. Product-development performance depends on the interaction between the machine, material, model orientation, exposure settings, support design, washing, drying, post-curing and inspection process. Yidimu’s quality-control guidance similarly treats these elements as a connected workflow rather than separate purchasing decisions.
Teams evaluating professional equipment can begin by reviewing industrial resin 3D printer options according to their actual prototype and production-trial requirements.
Start With the Part, Not the Printer
Before comparing machines, select several representative models from your development work.
Do not use only a small demonstration file with decorative details. A useful evaluation set should reflect the difficult features your team actually needs to print.
Include models such as:
- The largest enclosure or housing you expect to print
- A part containing critical holes or mating surfaces
- A thin-wall component
- A model with flat surfaces that may warp
- A part with deep channels or trapped resin areas
- A multi-part assembly
- A repeated batch of small components
- A flexible or lattice structure, when relevant
- A model containing surfaces that must remain free from support marks
For each model, document its dimensions, purpose, important features, preferred material behavior and acceptance criteria.
This part-based approach prevents the buying process from becoming a comparison of isolated numbers that may have little connection to your actual workflow.
Define What the Printed Part Must Prove
A product-development print should answer a specific engineering question.
For example:
- Does the housing shape look correct?
- Can two parts be assembled without interference?
- Is the button clearance acceptable?
- Can the model be handled during a customer review?
- Does the flexible structure compress in the intended direction?
- Are holes and slots accessible after support removal?
- Can ten identical parts be produced with acceptable consistency?
- Does the material remain stable after cleaning and curing?
The intended decision determines the required printer and resin.
A visual mock-up does not necessarily need the same dimensional control as an assembly-checking model. A flexible prototype should not be assessed using the same criteria as a rigid enclosure. A printed sample for production planning may need repeatability data rather than only a photograph of one successful part.
Resin 3D Printer Selection Table
| Evaluation Area | Questions to Ask | Why It Matters |
|---|---|---|
| Application | Is the part for appearance, fit, function, handling, tooling or a production trial? | Determines the required material and inspection method |
| Part size | What are the largest X, Y and Z dimensions after orientation and support addition? | Nominal build volume may not equal usable part capacity |
| Critical features | Which holes, edges, walls, threads or mating areas matter most? | Helps plan orientation, support and dimensional inspection |
| Material behavior | Must the part be rigid, tough, flexible, transparent, castable or heat resistant? | The resin often determines whether the sample is useful |
| Surface finish | Which surfaces will be visible or must remain free of support marks? | Affects orientation, support placement and finishing labor |
| Batch size | Is the printer producing one prototype or repeated groups of parts? | Influences platform area, workflow time and repeatability needs |
| Printing frequency | Will the system operate occasionally, daily or across multiple shifts? | Affects maintenance, resin handling and support requirements |
| Post-processing | How will parts be washed, dried, supported and UV cured? | Post-processing can alter dimensions, strength and surface quality |
| Inspection | How will the team decide whether a part passes? | Prevents subjective evaluation based only on appearance |
| Supplier support | Can the supplier review files, materials and failed prints? | Important when moving from demonstrations to routine operation |
| Operating cost | What is the cost per accepted part? | More useful than comparing resin price or machine price alone |
1. Match the Printer to the Main Product-Development Task
A company may use resin printing for several purposes, but one or two applications usually account for most of the workload.
Identify the primary task before comparing equipment.
Visual and presentation models
For appearance prototypes, evaluate:
- Surface smoothness
- Edge quality
- Visibility of small details
- Support-mark location
- Ease of sanding, coating or painting
- Consistency across large visible surfaces
The strongest resin may not be necessary, but the model should survive normal handling and finishing.
Assembly and fit verification
For parts that connect to other components, examine:
- Critical dimensions
- Hole and slot behavior
- Flatness
- Warping
- Wall stability
- Mating clearances
- Repeatability between print batches
- Changes after washing and post-curing
Do not treat the printer’s nominal pixel size or layer height as a guaranteed dimensional tolerance. Final results depend on the complete workflow, including geometry, orientation, exposure, support and post-processing.
Engineering prototypes
Engineering samples may need a balance of:
- Detail reproduction
- Toughness
- Dimensional stability
- Surface quality
- Drilling or finishing behavior
- Resistance to repeated handling
- Performance under the intended test conditions
Printed resin parts should not automatically be treated as final production components. Mechanical behavior can vary with material formulation, geometry, printing parameters and curing conditions. Test demanding parts under their real load, temperature and environmental conditions before approving the design.
Flexible parts and lattice structures
Flexible prototypes require more than a printer that can expose a flexible resin.
Confirm:
- Compatible flexible material range
- Target hardness or softness
- Wall and lattice thickness
- Rebound behavior
- Tear risk
- Support-removal difficulty
- Deformation during washing
- Post-curing requirements
- Part orientation and drainage
Teams developing soft samples, shoe components, wearable structures or elastic prototypes may need a dedicated flexible resin 3D printing system rather than a general-purpose machine.
Repeated samples and production trials
When the printer will produce multiple parts, evaluate:
- Number of parts per platform
- Preparation time between jobs
- Resin refill and filtering process
- Part removal time
- Cleaning capacity
- Curing capacity
- Operator involvement
- Inspection time
- Failed-job recovery
- Batch identification and record keeping
A printer that produces one strong sample may not necessarily support a controlled repeated workflow.
2. Evaluate the Usable Build Area
Build volume is important, but the maximum advertised dimensions do not always represent the practical size of a supported part.
A model may need to be angled to reduce cross-sectional area, improve drainage or move support marks away from critical surfaces. Supports also consume platform space and vertical height.
Ask the supplier to review:
- Original model dimensions
- Proposed orientation
- Supported dimensions
- Clearance around the platform
- Number of models per build
- Drainage requirements
- Risk of trapped resin
- Risk of deformation on broad flat surfaces
- Whether the part should be split
For repeated production, platform layout may matter more than the maximum height. A larger platform may allow more parts per batch, but it also creates questions about resin consumption, cleaning capacity, curing capacity and consistency across the build area.
3. Separate Resolution From Part Accuracy
High screen resolution, small pixels and thin layers can help reproduce details, but they do not independently guarantee an accurate part.
Final dimensions may be influenced by:
- Machine calibration
- Light distribution
- Exposure settings
- Resin behavior
- Model orientation
- Support force
- Wall thickness
- Part geometry
- Washing process
- Drying condition
- UV curing
- Inspection method
- Working environment
Instead of asking only, “What is the printer resolution?” ask:
- Which features can be reproduced reliably in my model?
- How are critical dimensions inspected?
- What changes may occur after post-curing?
- Can the same part be printed repeatedly?
- Can I test my own file before purchasing?
ISO/ASTM 52900 establishes common additive-manufacturing terminology, but a machine specification should still be interpreted within the actual process and application.
4. Choose Resin According to the Part Function
The printer provides the process platform, but the resin determines much of the final part behavior.
When comparing 3D printing resin materials, define the required properties in practical terms.
Do not request “strong resin” without explaining the load. Specify whether the part must resist bending, impact, compression, heat, repeated handling or long-term storage.
| Resin Direction | Typical Product-Development Use | Points to Confirm |
| General model resin | Appearance samples, design reviews and display models | Surface, color, detail, curing and handling strength |
| ABS-like or tougher resin | Housings, rigid samples and assembly checks | Impact needs, wall thickness, brittleness and real load conditions |
| Flexible resin | Soft samples, lattice structures and cushioning prototypes | Hardness, rebound, tear behavior, thickness and curing |
| Clear or translucent resin | Fluid paths, lighting concepts and transparent housings | Clarity after finishing, yellowing, polishing and wall thickness |
| Castable resin | Patterns for downstream casting workflows | Burnout process, residue, surface and casting compatibility |
| Application-specific dental resin | Dental models or indicated dental devices | Intended use, printer compatibility, curing instructions and regulations |
Never assume that a resin is suitable simply because it can be cured by the printer’s light source. Confirm exposure compatibility, recommended settings, washing method, post-curing conditions and intended application.
5. Assess the Complete Post-Processing Workflow
Printing is only one stage of a resin workflow.
A practical process normally includes:
- Removing the build platform
- Draining excess resin
- Removing the part safely
- Washing uncured surface resin
- Allowing the part to dry completely
- Removing supports at the appropriate stage
- UV post-curing
- Finishing support contact areas
- Measuring critical features
- Recording the result
Yidimu’s manufacturing and support pages describe cleaning, support removal and UV curing as part of the complete process rather than optional activities after the “real” printing work.
When comparing printers, ask whether the post-processing equipment can handle the largest model and expected batch quantity.
A high-capacity printer paired with an undersized washing or curing process can create a bottleneck. Inconsistent drying or curing may also make it difficult to compare parts between batches.
Review suitable UV curing equipment for resin prints while planning the printer purchase, not after the machine arrives.
Resin-handling safety
Uncured photopolymer resin should be handled according to the resin supplier’s safety data sheet and operating instructions. Appropriate protective equipment, ventilation, spill control, waste handling and workspace procedures should be established before production begins.
NIOSH identifies vat polymerization as a process that can involve chemical exposure and other workplace hazards, making process controls and safe operating practices part of equipment planning.
6. Measure Throughput by Accepted Parts
Printer speed is often presented as a simple machine value, but product-development throughput is better measured as accepted parts per day or per week.
The full cycle can include:
- File preparation
- Slicing
- Platform setup
- Printing
- Resin drainage
- Part removal
- Washing
- Drying
- Support removal
- Post-curing
- Surface finishing
- Inspection
- Reprinting failed or rejected parts
A fast exposure process may not improve total output if the team spends excessive time removing supports, cleaning deep channels or correcting deformation.
Calculate:
Accepted-part throughput = usable parts produced ÷ total workflow time
For repeated work, track:
- Planned parts
- Successfully printed parts
- Rejected parts
- Rework time
- Cleaning time
- Curing time
- Operator time
- Resin consumed
- Support material
- Waste
- Equipment downtime
This information provides a more realistic comparison than a single advertised print-speed figure.
7. Calculate the Cost per Usable Part
The purchase price is only one part of the investment.
A practical operating-cost review should include:
- Printer purchase
- Resin
- Supports
- Failed prints
- Cleaning liquid or washing consumables
- Gloves and other protective equipment
- Resin filters and containers
- Replacement tanks or films
- UV curing equipment
- Maintenance parts
- Software requirements
- Operator labor
- Inspection
- Waste handling
- Training
- Technical support
- Downtime
The least expensive resin does not always produce the lowest-cost part. A material that requires repeated printing, creates difficult support removal or fails during assembly testing may increase the real cost of development.
Compare systems using:
Cost per accepted part = total workflow cost ÷ number of parts that pass inspection
This method connects purchasing decisions to engineering output.
8. Examine Software and File Preparation
Product-development teams should evaluate the entire digital workflow, not only whether the printer can read a file.
Confirm:
- Supported file formats
- Slicing workflow
- Orientation controls
- Support-generation controls
- Hollowing and drainage options
- Platform layout tools
- Parameter management
- File transfer
- Job history
- Ability to save proven settings
- Compatibility with your team’s existing CAD process
Automatic support generation can be a useful starting point, but critical projects may require manual adjustment. Engineers should be able to protect mating surfaces, holes, cosmetic areas and measurement points from unnecessary support contact.
9. Evaluate Maintenance and Daily Operation
A printer used for product development should fit the team’s real operating environment.
Ask who will:
- Prepare files
- Load and change resin
- Inspect the tank
- Clean the platform
- Remove parts
- Maintain washing equipment
- Operate the curing unit
- Measure parts
- Record successful parameters
- Diagnose failed jobs
Review daily and periodic maintenance requirements, including:
- Build-platform inspection
- Resin-tank inspection
- Resin filtering
- Optical surface cleaning
- Waste handling
- Calibration checks
- Replacement components
- Storage conditions
- Procedures after a failed print
A technically capable printer may still be a poor choice when the workflow depends on skills, maintenance resources or consumables that are not available to the team.
10. Review Supplier Support Before Purchasing
Professional support should cover more than basic machine startup.
Useful support may include:
- Application review
- Model evaluation
- Resin compatibility discussion
- Orientation and support guidance
- Parameter communication
- Failure analysis
- Post-curing guidance
- Maintenance information
- Spare-part availability
- Warranty boundaries
- File and workflow troubleshooting
Yidimu states that its support can cover machine setup, printing parameters, resin compatibility, failed-print troubleshooting and UV-curing workflow, subject to the product, order terms and type of issue.
Before ordering, send the supplier a realistic technical request. The quality of the response can reveal whether the discussion is based on your application or only on generic sales information.
Step-by-Step Printer Evaluation Workflow
Step 1: Define the development objective
State what decision the print must support:
- Appearance approval
- Assembly verification
- Functional testing
- Flexible structure evaluation
- Tooling preparation
- Customer presentation
- Production trial
Step 2: Select representative files
Choose three to five real models covering:
- Largest part
- Most detailed part
- Most difficult orientation
- Critical assembly
- Repeated batch
Step 3: Mark critical requirements
Document:
- Overall dimensions
- Critical dimensions
- Surface requirements
- Mating surfaces
- Thin walls
- Holes and channels
- Load direction
- Areas where supports are prohibited
Step 4: Define resin behavior
Specify whether the model needs:
- Rigidity
- Toughness
- Flexibility
- Transparency
- Heat resistance
- Casting behavior
- Application-specific indication
Step 5: Estimate workload
Record:
- Parts per week
- Parts per batch
- Required turnaround
- Number of operators
- Expected resin changes
- Inspection requirements
Step 6: Review the entire workflow
Check the printer, resin, software, washing, drying, support removal, curing, finishing and inspection stages together.
Step 7: Request a sample print
A representative sample is one of the most useful ways to evaluate a system. Yidimu’s guidance recommends providing the original model, dimensions, intended use, material characteristics, surface requirements, quantity, assembly relationships and inspection method.
Teams can use a sample printing service to review printability and workflow suitability before selecting equipment.
Step 8: Inspect the completed sample
Do not judge only from photographs.
Inspect:
- Overall dimensions
- Critical dimensions
- Flatness
- Warping
- Hole size
- Wall condition
- Edge definition
- Support marks
- Surface finish
- Assembly fit
- Flexible behavior, when applicable
- Cleaning condition
- Post-curing condition
Step 9: Ask for process information
Request the relevant:
- Printer configuration
- Resin
- Orientation
- Layer setting
- Support strategy
- Washing process
- Drying process
- Post-curing process
- Inspection method
Step 10: Repeat the test when repeatability matters
One successful print demonstrates feasibility. It does not prove repeatability.
When the application requires repeated output, test:
- Multiple identical parts on one platform
- The same model in separate print jobs
- Critical dimensions after curing
- Assembly consistency
- Surface consistency
- Operator-to-operator consistency
Product-Development Buyer Checklist
Before approving a resin 3D printer, confirm that you have answered these questions:
- What is the printer’s main application?
- Which real models were used for evaluation?
- What is the largest supported part size?
- Which dimensions are critical?
- What surface quality is required?
- Which resin properties are necessary?
- Is the resin compatible with the complete workflow?
- How many accepted parts are required per week?
- Can washing and curing equipment handle the batch?
- How will finished parts be inspected?
- Has your own model been sample printed?
- Were parts evaluated after complete post-processing?
- Was repeatability tested?
- What consumables require regular replacement?
- What training is needed?
- What maintenance will the operator perform?
- What technical support is available?
- What are the warranty and service boundaries?
- What is the estimated cost per accepted part?
- Can the workflow expand when demand increases?
Common Mistakes to Avoid
Choosing by resolution alone
High resolution may support small details, but it does not guarantee correct dimensions, flatness, assembly fit or repeatability.
Comparing only nominal build volume
The model must fit after orientation and support addition. The platform must also accommodate the required batch layout.
Selecting the printer before the resin
A printer is useful only when a compatible resin can provide the required part behavior.
Ignoring washing and curing capacity
Post-processing equipment can become the main workflow bottleneck, especially for large models or repeated batches.
Testing only a supplier demonstration model
Demonstration files may avoid the thin walls, broad surfaces, holes, assemblies or support-sensitive areas found in your products.
Approving a sample from photographs
Surface appearance alone does not confirm dimensional performance, assembly fit or final material behavior.
Treating one successful print as proof of production reliability
Repeatability should be evaluated across multiple parts and print jobs.
Using printed prototypes as final parts without testing
Suitability for heat, impact, chemicals, long-term load or outdoor use depends on the material, geometry and curing process.
Ignoring operator time
Manual support removal, washing, finishing and inspection can significantly affect throughput and cost.
Buying without reviewing technical support
Workflow problems may involve the file, resin, parameters, supports, machine condition or post-processing. Support should cover more than hardware replacement.
Special Note for Dental Product Development
Dental models, guides, temporary applications and other dental workflows require application-specific materials and controlled processing.
A printer capable of producing a dental-shaped object is not automatically approved or suitable for every dental application. The FDA notes that dental device materials are cleared for specific intended uses rather than unlimited applications.
Customers should confirm resin indication, post-curing process and local regulatory requirements before clinical or intraoral use.
The complete dental workflow may also require validated washing, curing, documentation, inspection and sterilization procedures depending on the intended device and jurisdiction.
FAQ
What is the most important factor when choosing a resin 3D printer for product development?
The most important factor is whether the complete printer, resin and post-processing workflow can produce parts that meet your actual development requirements. Start with representative models and measurable acceptance criteria.
Is higher resolution always better for engineering prototypes?
Not necessarily. Resolution may affect detail reproduction, but engineering usefulness also depends on calibration, resin behavior, orientation, supports, washing, curing and dimensional inspection.
How large should the printer be?
Choose a build area that accommodates your largest supported model and expected batch layout. Consider orientation, support space and post-processing capacity rather than comparing nominal dimensions alone.
Which resin is best for product development?
There is no single best resin. The right material depends on whether the part is for appearance, assembly, handling, impact testing, flexible evaluation, transparency, casting or another specific task.
Can one resin 3D printer handle every material?
A printer may support several resin categories, but compatibility should be confirmed for the light source, exposure settings, resin tank, washing process and post-curing conditions. Specialty materials may require a dedicated or controlled workflow.
Should I request a sample before buying?
Yes, especially when dimensions, surface quality, flexible behavior, large-part stability or repeatability matter. Use your own file and inspect the fully washed and cured sample.
How should I compare printer speed?
Compare accepted parts per day or week rather than a single exposure or vertical-speed figure. Include preparation, printing, washing, drying, curing, finishing, inspection and rework.
What information should I send to a printer supplier?
Provide the model file, overall dimensions, critical dimensions, intended application, resin requirements, expected quantity, surface needs, assembly relationships and preferred inspection method.
Is a resin prototype suitable for functional testing?
It may support functional testing when the resin, geometry and curing process match the test. Confirm the expected load, impact, heat, chemical exposure and service duration, then test the printed part under realistic conditions.
How can I determine whether a supplier offers useful technical support?
Send a representative file and a detailed application description. A useful response should address part orientation, resin choice, critical features, post-processing, inspection and possible workflow risks rather than only recommending a machine model.
Conclusion: Choose the Workflow, Not Just the Printer
Learning how to choose a resin 3D printer for product development begins with a clear definition of what the printed part must prove.
Do not let resolution, build volume or advertised speed make the decision on their own. Evaluate the actual model, resin properties, usable build capacity, support strategy, washing, drying, UV curing, inspection, repeatability, operator workload and cost per accepted part.
A representative sample print is often the most direct way to test these factors before investing in equipment.
To discuss a product-development workflow with Yidimu, prepare your:
- Model size
- Resin requirement
- Application
- Expected workflow
- Critical dimensions
- Production or sample-making needs
You can then contact Yidimu for workflow review and equipment-selection discussion.
References
- ISO/ASTM 52900:2021, Additive Manufacturing—General Principles—Fundamentals and Vocabulary.
- National Institute for Occupational Safety and Health, Safe 3D Printing Is for Everyone, Everywhere.
- U.S. Food and Drug Administration, Technical Considerations for Additive Manufactured Medical Devices.
- Yidimu, 3D Printer Quality Control Process.


