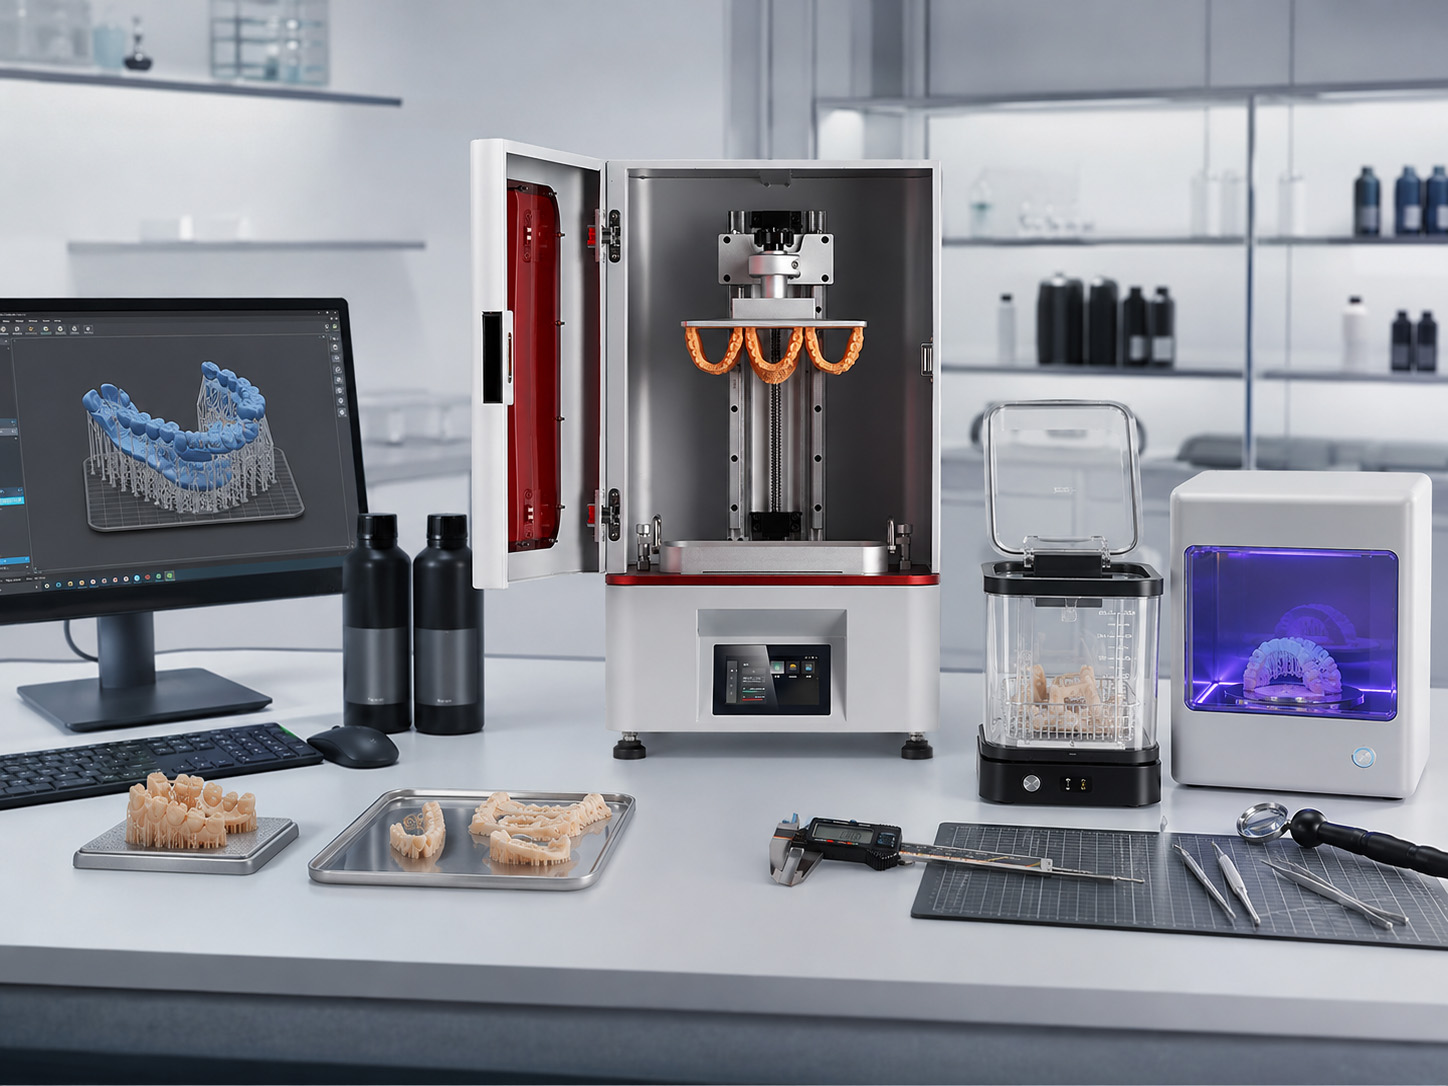
Resin 3D printing works by selectively exposing liquid photopolymer resin to a controlled light source. A digital 3D model is divided into thin layers by slicing software. The printer then cures the corresponding shape of each layer in the resin vat, moves the build platform, and repeats the cycle until the complete object has formed. The printed part is removed, drained, washed to remove uncured resin, dried, support structures are removed, and the part is usually post-cured under controlled light. Final quality depends on the printer, resin, model orientation, exposure settings, cleaning, curing, calibration, and inspection workflow.
Introduction
Resin 3D printing belongs to a broader additive manufacturing category known as vat photopolymerization. Additive manufacturing creates physical geometry through the successive addition of material, rather than removing material from a solid block.
In vat photopolymerization, a light source activates photoinitiators in a liquid resin. This starts a chemical reaction that cross-links the resin’s polymer components and turns a selected area from liquid into solid material. Repeating this exposure layer by layer produces the final three-dimensional part.
For professional users, however, resin printing is not simply a matter of loading a file and pressing Start. The complete result depends on the interaction between the model, slicing strategy, equipment, resin, operating environment, cleaning method, post-curing process, and inspection criteria.
How Does Resin 3D Printing Work Step by Step?
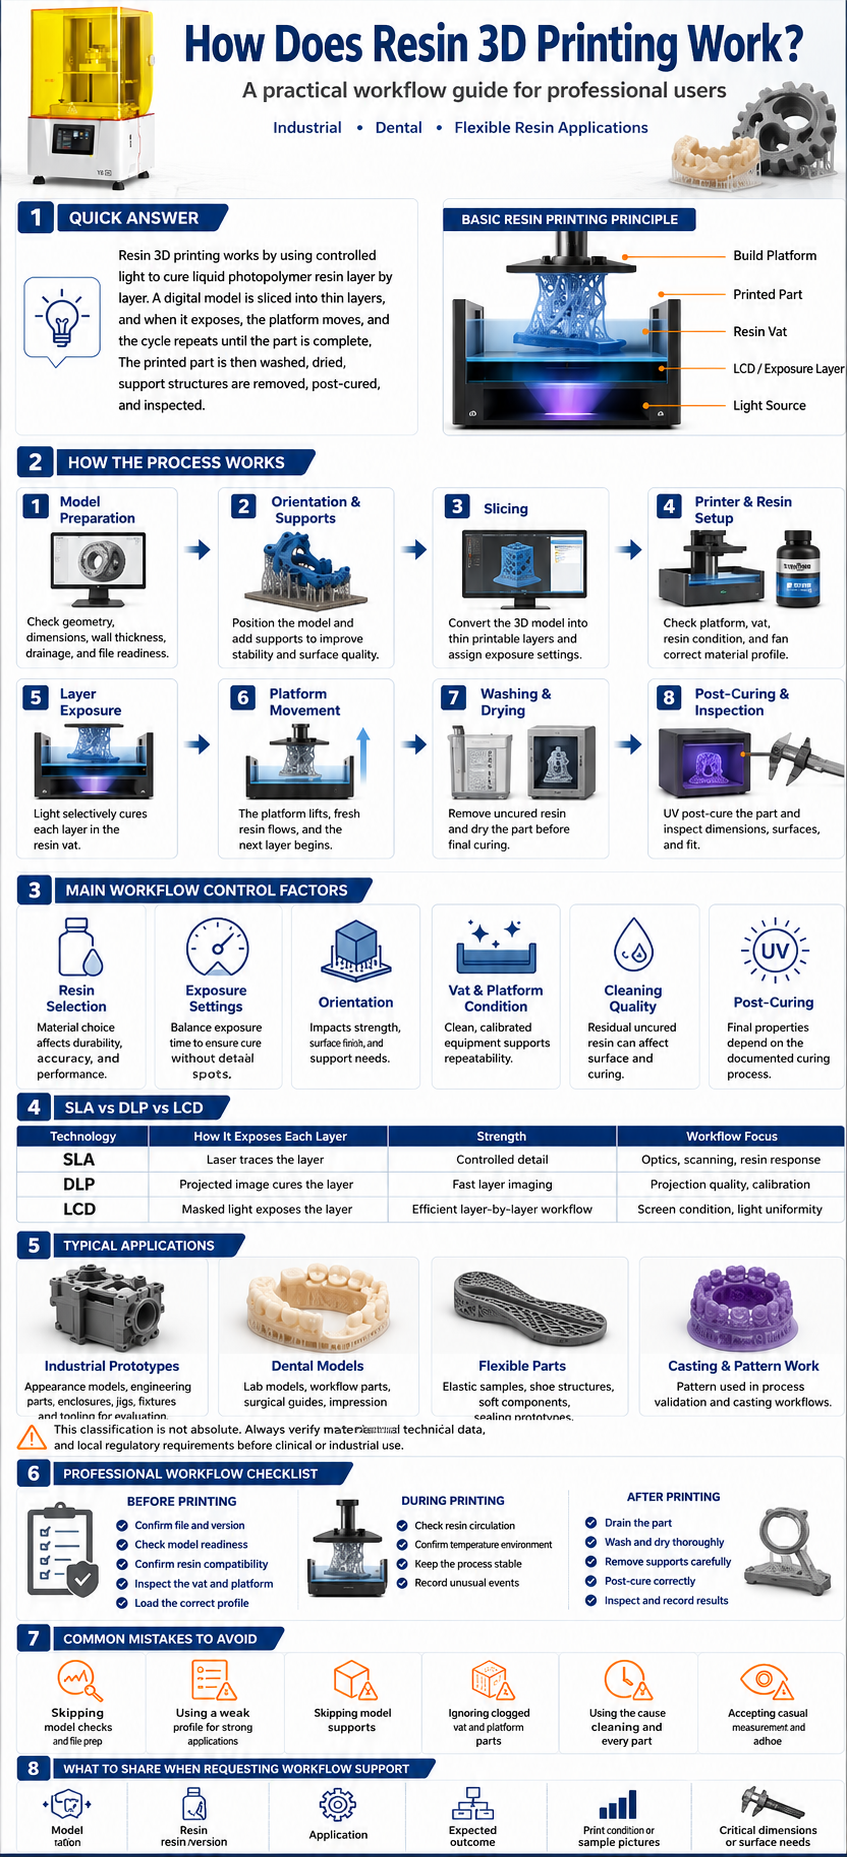
A professional resin printing workflow normally follows these stages:
- Define the application requirements.
- Inspect and prepare the digital model.
- Select the printer and compatible resin.
- Orient the model and design supports.
- Slice the model into exposure layers.
- Prepare the printer, platform, vat, and resin.
- Expose and separate each layer.
- Remove and drain the completed print.
- Wash away uncured surface resin.
- Dry the part thoroughly.
- Remove supports where appropriate.
- Post-cure the part according to the resin instructions.
- Inspect dimensions, surfaces, and application features.
- Record the settings for future repeatability.
Each stage can affect the next. A part that appears complete when it leaves the printer may still fail inspection if it was poorly oriented, inadequately washed, unevenly post-cured, or printed with a resin that does not match the final application.
The Main Components of a Resin 3D Printing System
| Component | Function | Why It Matters |
|---|---|---|
| Digital 3D model | Defines the intended part geometry | Model errors can cause missing surfaces, thin walls, trapped resin, or unprintable features |
| Slicing software | Divides the model into layers and generates printer instructions | Controls orientation, support layout, layer settings, and exposure strategy |
| Light source | Supplies the energy required to cure selected resin areas | Light uniformity and control influence layer formation |
| Resin vat | Holds the liquid photopolymer | Vat condition, cleanliness, and film integrity affect separation and exposure |
| Build platform | Supports the part while it is being formed | Poor leveling or contamination may cause adhesion failures |
| Motion system | Repositions the platform between layers | Stable and controlled movement supports consistent layer formation |
| Photopolymer resin | Becomes the printed material after exposure | Resin formulation affects processing, cleaning, curing, and final properties |
| Washing equipment | Removes uncured resin from the part | Incomplete cleaning can affect surfaces, dimensions, and curing |
| UV curing equipment | Performs controlled post-curing | Curing requirements depend on the resin, geometry, and intended use |
| Inspection tools | Verify whether the part meets requirements | Visual appearance alone does not confirm dimensional or functional suitability |
Yidimu’s current product range includes dental, industrial, and flexible resin printers, along with resins and UV curing equipment intended for professional workflows. Equipment should be selected according to the application, part size, material, surface requirements, printing frequency, and post-processing plan.
1. Application and Model Requirements Are Defined
The process should begin with the required result, not with the printer specification.
Before preparing the file, the user should determine:
- What will the part be used for?
- Is it a visual model, engineering prototype, dental model, flexible sample, casting pattern, fixture, or production trial part?
- Which dimensions or surfaces are critical?
- Does the part need to fit another component?
- Which material behavior is required?
- How many parts are needed?
- How frequently will the job be repeated?
- Which cleaning and curing workflow is available?
- Are there regulatory or application-specific requirements?
These questions influence printer size, resin selection, model orientation, support placement, inspection methods, and whether sample validation is required before production.
2. The Digital Model Is Checked
The printer can only reproduce the geometry it receives. A visually acceptable CAD model may still contain problems that affect printing.
Common model checks include:
- Correct overall dimensions
- Correct units and scale
- Closed and complete surfaces
- Adequate wall thickness
- Drainage for hollow structures
- Clearance between assembled parts
- Accessible internal cavities
- Unsupported islands
- Small holes and narrow channels
- Sharp transitions or fragile edges
- Areas where supports can be removed safely
Hollowing a large model may reduce resin consumption, but it also introduces new requirements. Drainage holes must be positioned so uncured resin and cleaning liquid do not remain trapped inside the part. Hollow geometry should therefore be reviewed according to the model orientation and cleaning process.
3. The Model Is Oriented and Supported
Orientation determines how the geometry is divided into layers and how forces act on the part during printing.
A suitable orientation may help:
- Reduce large cross-sectional exposure areas
- Protect important cosmetic surfaces
- Improve drainage
- Place support marks in less critical locations
- Support overhangs and isolated features
- Reduce distortion risk
- Improve packing efficiency on the build platform
The smallest possible number of supports is not always the best objective. Too few supports can allow movement, deformation, or complete detachment. Too many supports can increase resin use, cleaning work, support-removal time, and surface damage.
Professional preparation balances stability, surface quality, accessibility, material consumption, and post-processing effort.
4. The Model Is Sliced Into Layers
Slicing software converts the three-dimensional model into a sequence of two-dimensional layer images or toolpaths.
The operator may need to define or confirm:
- Printer profile
- Resin profile
- Layer thickness
- Normal exposure settings
- Initial-layer settings
- Lift or separation movement
- Rest periods
- Support parameters
- Anti-aliasing or image-processing options
- Part placement
- Number of copies
- Estimated resin requirement
These settings should not be copied blindly from an unrelated resin or printer. A usable exposure profile depends on the resin formulation, light source, optical system, layer thickness, vat configuration, temperature, and required result.
5. The Printer and Resin Are Prepared
Before printing, the operator should check the equipment rather than assuming that the previous job left it ready.
A pre-print check may include:
- Build platform is clean and correctly installed.
- Resin vat is clean and undamaged.
- Vat film or optical window has no residue or major wear.
- No cured particles remain in the resin.
- The resin is compatible with the printer’s light system.
- Resin has been prepared according to its instructions.
- Resin quantity is sufficient for the job.
- The printer is positioned on a stable surface.
- The working environment meets the equipment and material requirements.
- The correct file and resin profile have been selected.
Contamination is particularly important. A small cured fragment in the vat can interfere with the next exposure cycle, damage the vat film, or place abnormal pressure on the build platform.
6. Light Cures the First Resin Layer
When printing begins, the build platform moves into its starting position relative to the vat.
The light system then exposes the shape of the first layer. The energy activates the photoinitiators in the resin and initiates cross-linking. The exposed area solidifies and adheres to the build platform.
Initial layers often use a different exposure strategy from normal layers because they must establish reliable attachment to the platform. Excessive initial exposure may make removal difficult or affect lower geometry, while inadequate exposure may cause the print to detach.
7. The Platform Moves and the Layer Separates
After a layer is exposed, the printer must create space for fresh liquid resin to flow into the next layer position.
In a bottom-up system, the cured layer separates from the vat film or transparent interface. The platform moves, resin flows beneath the part, and the platform returns to the required position for the next exposure.
This cycle involves four basic actions:
- Expose the selected resin area.
- Separate the cured layer from the vat interface.
- Reposition the build platform.
- Allow fresh resin to refill the exposure area.
The sequence repeats until every layer has been produced. Vat photopolymerization may use laser-based, projected-image, or masked-light exposure architectures, but all rely on controlled light-induced solidification of the resin.
SLA, DLP, and LCD Resin Printing Compared
| Technology | How the Layer Is Exposed | Main Workflow Consideration |
|---|---|---|
| Laser-based SLA | A controlled laser traces the geometry of the layer | Optical path, scanning control, resin response, and motion stability affect the result |
| DLP | A projector exposes a two-dimensional layer image | Projected image quality, optical calibration, and exposure control are important |
| LCD or masked-light printing | An LCD mask controls which areas receive light from an LED source | Screen condition, light uniformity, resin compatibility, and exposure settings must be controlled |
No exposure technology is universally suitable for every application. Printer selection should also consider:
- Build volume
- Required part dimensions
- Resin compatibility
- Intended applications
- Throughput requirements
- Maintenance requirements
- Calibration procedure
- Post-processing capacity
- Technical support
- Repeatability expectations
A buyer comparing systems can review Yidimu’s industrial resin 3D printer options, dental 3D printers for labs and clinics, and flexible resin printing systems according to the intended workflow rather than a single headline specification.
8. The Completed Part Is Removed and Drained
After the last layer is exposed, the platform rises and the completed part remains attached to it.
The operator should normally allow excess resin to drain before moving the part to the washing area. Drainage can reduce liquid resin transfer, cleaning-liquid contamination, and unnecessary material loss.
The part must still be treated as incompletely processed at this stage. Uncured resin may remain:
- On external surfaces
- Around support contact points
- Inside holes
- Within recessed features
- Between lattice structures
- Inside hollow cavities
- In narrow channels
Appropriate gloves and handling procedures should be used when removing the platform and transferring the part.
9. The Part Is Washed
Washing removes uncured resin from the printed surface.
The correct cleaning liquid and procedure depend on the resin manufacturer’s instructions. A cleaning method suitable for one material should not automatically be applied to another.
Variables that may affect cleaning include:
- Cleaning-liquid type
- Cleaning time
- Agitation
- Number of wash stages
- Part geometry
- Hollow cavities
- Lattice density
- Resin viscosity
- Cleaning-liquid condition
- Drying method
Insufficient washing can leave sticky surfaces, obscure details, contaminate tools, and interfere with post-curing. Excessive or incompatible washing may affect surfaces or material performance.
The goal is not merely to make the part look clean. The cleaning process must be controlled and repeatable.
10. The Part Is Dried
A washed part should normally be dried before post-curing.
Residual cleaning liquid can collect in holes, internal corners, support junctions, or recessed areas. Curing a part while liquid remains on its surface may lead to uneven appearance or inconsistent processing.
Drying time varies according to:
- Part size
- Geometry
- Cleaning liquid
- Internal cavities
- Airflow
- Temperature
- Resin instructions
Operators should inspect difficult-to-see areas rather than checking only the largest exterior surfaces.
11. Supports Are Removed
Support-removal timing depends on the material, geometry, support design, and recommended workflow.
Removing supports before final curing may reduce cutting effort for some resins. In other cases, keeping selected supports during curing may help maintain geometry. There is no universal sequence suitable for every resin and part.
Support removal should protect:
- Functional surfaces
- Mating features
- Thin walls
- Sharp edges
- Dental margins
- Textured surfaces
- Narrow projections
- Flexible structures
Support marks may require trimming, sanding, polishing, or another approved finishing method.
12. The Part Is UV Post-Cured
The light exposure inside the printer creates the geometry, but many resin systems require an additional post-curing stage after washing and drying.
Post-curing may help the material reach its intended level of conversion and develop more stable final properties. The appropriate wavelength, temperature, time, part orientation, and curing equipment depend on the resin and its documented process. NIOSH describes washing and UV post-curing as typical stages in vat-photopolymerization post-processing.
Post-curing should not be treated as a universal fixed-time operation. Requirements may vary according to:
- Resin formulation
- Part dimensions
- Wall thickness
- Color and opacity
- Geometry
- Curing unit
- Light distribution
- Application
- Required final properties
Users planning a complete workflow should evaluate suitable UV curing equipment for resin prints together with the printer and resin, rather than treating post-processing as an unrelated purchase.
13. The Part Is Inspected
A successful print is not defined only by whether the object remained on the build platform.
Professional inspection may include:
- Overall dimensions
- Critical dimensions
- Hole diameters
- Wall thickness
- Flatness
- Warping
- Surface defects
- Support marks
- Cracks or incomplete regions
- Internal drainage
- Assembly fit
- Functional movement
- Color and surface consistency
- Batch identification
- Process records
Inspection requirements should reflect the part’s intended use. A visual presentation model may need different acceptance criteria from an assembly prototype, dental working model, flexible shoe sample, or small production component.
Resin Selection by Application
| Application | Typical Resin Priority | Workflow Questions |
|---|---|---|
| Visual and form prototype | Surface appearance, detail, dimensional suitability | Will the model be painted, photographed, handled, or assembled? |
| Engineering sample | Fit, rigidity, toughness, temperature or load requirements | Which properties are critical, and how will they be verified? |
| Dental model | Detail, dimensional consistency, workflow compatibility | Is the resin indicated for the intended model type and documented process? |
| Flexible sample | Hardness, flexibility, rebound, tear behavior | Does the structure require solid walls, thin membranes, or lattice geometry? |
| Casting pattern | Burnout behavior and casting-process compatibility | Has the complete printing, curing, investment, and burnout workflow been tested? |
| Fixture or trial part | Stability, wear, load, and assembly requirements | Is the part for temporary validation or repeated operational use? |
| Small production run | Repeatability, inspection, batch control, post-processing capacity | Can the complete workflow be reproduced across multiple builds? |
A resin name alone does not establish suitability. Users should review the technical data sheet, safety data sheet, printer compatibility, cleaning instructions, curing instructions, and application limitations. Yidimu’s available resin materials for professional workflows cover several application categories, but each project should still be evaluated individually.
What Determines Resin Print Quality?
Model orientation
Orientation affects support placement, layer cross-section, drainage, visible surfaces, and mechanical loading during separation.
Support strategy
Supports must stabilize the geometry without unnecessarily damaging critical surfaces or creating excessive finishing work.
Exposure settings
Underexposure may cause weak layers, missing details, or separation failures. Excessive exposure may enlarge features, close small openings, or make support removal more difficult.
Layer thickness
A thinner layer does not automatically guarantee a better complete part. Layer selection affects print time, exposure requirements, geometry reproduction, and process sensitivity.
Resin condition
Resin performance may be affected by storage, age, contamination, settling, temperature, previous exposure, and mixing procedure.
Platform calibration
Incorrect platform positioning or leveling can cause initial-layer adhesion problems and uneven conditions across the build area.
Vat condition
Clouding, damage, cured debris, residue, or excessive wear may interfere with light transmission and layer separation.
Cleaning quality
Residual uncured resin may obscure details, alter surfaces, or affect post-curing.
Post-curing control
Uneven or inappropriate curing can produce inconsistent results. The documented process should be followed rather than using one curing program for every material.
Inspection and recordkeeping
Repeatability improves when successful jobs are documented. Important records may include printer, resin batch, file revision, orientation, support profile, exposure settings, cleaning procedure, curing procedure, environmental conditions, and inspection results.
Professional Resin 3D Printing Workflow Checklist
Before Printing
- Confirm the part’s intended use.
- Identify critical dimensions and surfaces.
- Check model scale and geometry.
- Confirm printer build volume.
- Confirm resin and light-source compatibility.
- Review the resin instructions and SDS.
- Select a suitable orientation.
- Check all unsupported islands.
- Add drainage to hollow models.
- Verify support access and removal areas.
- Inspect the build platform and vat.
- Confirm sufficient resin quantity.
- Load the correct printer and resin profile.
During Printing
- Check whether the initial layers attach correctly.
- Observe for unusual platform movement or sound.
- Keep the printer enclosure closed where required.
- Avoid interrupting the process unnecessarily.
- Record any abnormal events.
- Stop the process safely if a clear failure occurs.
After Printing
- Allow the part to drain.
- Wear the recommended protective equipment.
- Transfer the part without contaminating clean areas.
- Wash using the approved procedure.
- Inspect cavities and narrow channels.
- Dry the part completely.
- Remove supports using appropriate tools.
- Post-cure according to the resin instructions.
- Inspect the completed part.
- Record the results and any setting changes.
Resin Handling and Workplace Safety
Liquid resin, cleaning chemicals, and post-processing activities require a controlled working procedure. NIOSH notes that some liquid resin chemicals may cause skin irritation or sensitization. Its guidance recommends following the SDS, using appropriate chemical-resistant gloves, and using eye protection where liquid splashing may occur.
A professional workplace should consider:
- Resin and cleaning-chemical SDS requirements
- Appropriate chemical-resistant gloves
- Eye protection
- Protective work clothing where needed
- Suitable ventilation or source control
- Labeled resin and waste containers
- Spill procedures
- Separation of clean and contaminated tools
- Fire precautions for flammable cleaning liquids
- Local waste and environmental requirements
- Staff training
- Equipment maintenance procedures
Ventilation requirements cannot be determined from printer type alone. Workspace size, chemical use, number of machines, enclosure design, and local requirements should be considered in the risk assessment. NIOSH identifies ventilation, enclosures, and local exhaust as possible engineering controls, while noting that workplace conditions vary.
Special Considerations for Dental Resin Printing
Dental printing requires control of the complete workflow, not only the printer.
Relevant variables may include:
- Source model or scan quality
- Dental design procedure
- Orientation
- Support placement
- Resin indication
- Printer compatibility
- Exposure profile
- Cleaning process
- Drying
- Post-curing
- Support removal
- Inspection
- Traceability
- Local regulatory requirements
A material described broadly as a dental resin is not automatically appropriate for every dental application.
Customers should confirm resin indication, post-curing process and local regulatory requirements before clinical or intraoral use.
The FDA’s additive-manufacturing guidance emphasizes that medical-device applications involve process-specific technical considerations, testing, and characterization.
Common Mistakes to Avoid
1. Selecting a printer only by resolution terminology
A screen, pixel, or layer specification does not describe the complete production result. Optics, mechanics, resin, calibration, orientation, post-processing, and inspection also matter.
2. Using one resin profile for every material
Different resin formulations may require different exposure, movement, cleaning, and curing conditions.
3. Ignoring the final application
A visually attractive part may still be unsuitable for assembly, repeated handling, dental use, flexible testing, elevated temperature, or mechanical loading.
4. Printing a model without geometry inspection
Unsupported islands, trapped volumes, thin walls, and defective surfaces can cause failures that printer settings cannot correct.
5. Minimizing supports without evaluating stability
Too few supports may create movement, warping, missing features, or detachment.
6. Adding excessive supports
Unnecessary supports increase material use, cleaning difficulty, surface damage, and finishing time.
7. Leaving cured particles in the vat
Debris can interfere with later jobs and may damage the vat interface.
8. Washing only the visible exterior
Uncured resin may remain in holes, recesses, lattices, channels, and hollow cavities.
9. Using the same curing time for every part
Curing requirements depend on the resin, geometry, equipment, and application.
10. Judging success only by appearance
Professional parts may require dimensional inspection, fit testing, functional testing, or documented process validation.
11. Changing several parameters at once
When multiple variables are changed together, it becomes difficult to determine which change improved or damaged the result.
12. Buying equipment without planning post-processing
Printer capacity is useful only when washing, drying, curing, support removal, inspection, staffing, and material handling can support the same workload.
How to Choose a Resin 3D Printing Workflow
Before purchasing equipment, prepare the following project information:
| Decision Area | Information to Provide |
|---|---|
| Part geometry | Overall dimensions, wall thickness, cavities, channels, lattice features |
| Application | Dental model, industrial prototype, flexible sample, casting pattern, fixture, or production part |
| Material requirement | Rigid, tough, flexible, castable, model-focused, or application-specific |
| Quality requirement | Surface appearance, detail, dimensional fit, or functional performance |
| Production need | One sample, repeated prototypes, multiple daily builds, or small batches |
| Workflow | Available washing, drying, curing, inspection, and waste-handling equipment |
| Validation | Required measurements, assembly tests, material tests, or sample approval |
| Support need | Installation, training, parameter development, troubleshooting, or application review |
When the application is uncertain, a controlled test part is often more informative than comparing specification sheets alone. Yidimu offers a sample printing service for users who need to evaluate geometry, resin choice, surface condition, and workflow requirements before equipment selection.
Frequently Asked Questions
Does resin 3D printing melt plastic?
No. Resin printing does not normally melt a thermoplastic filament. It uses light to trigger polymerization and solidify selected areas of liquid photopolymer resin.
Does the entire resin vat become solid?
No. Only areas receiving the required controlled exposure are intended to solidify. The remaining resin stays liquid and may be retained for appropriate future use if it has been handled and filtered according to the material and equipment instructions.
Is resin printing the same as SLA?
SLA is one type of vat photopolymerization. Resin printing may also use projected-image or masked-light exposure systems. The term “resin 3D printing” is therefore broader than one machine architecture.
Does every resin print need washing?
Vat-photopolymerized parts normally require removal of uncured surface resin. The specific cleaning liquid and procedure depend on the material instructions.
Does every resin print need UV post-curing?
Many professional resin workflows require post-curing, but the exact procedure depends on the material and intended application. Users should follow the resin’s documented instructions rather than applying a universal curing time.
How long does resin 3D printing take?
Printing time depends on part height, layer settings, exposure cycle, movement settings, printer architecture, resin, number of parts, and support arrangement. Total lead time must also include preparation, printing, drainage, washing, drying, support removal, curing, and inspection.
Can any resin be used in any resin printer?
No. Compatibility depends on the printer’s light system, exposure range, vat design, software profile, and the resin manufacturer’s requirements. Compatibility should be confirmed before use.
Why do resin prints fail to stick to the platform?
Possible causes include incorrect platform calibration, contaminated surfaces, damaged vat film, insufficient initial-layer exposure, unsuitable resin conditions, incorrect settings, or excessive separation forces.
Why are holes or small gaps smaller than the CAD model?
Possible causes include overexposure, light spread, model orientation, insufficient drainage, trapped uncured resin, cleaning problems, or the feature being below the reliable capability of the selected printer-resin workflow.
Why does a resin print feel sticky after washing?
The part may still contain uncured surface resin, contaminated cleaning liquid may have been used, the geometry may have trapped resin, the part may not have dried fully, or the cleaning and curing procedure may not match the resin instructions.
Is resin 3D printing accurate?
Resin printing can support detail-sensitive and dimensionally controlled applications, but accuracy should not be treated as automatic or guaranteed. Results depend on model preparation, equipment, resin, calibration, exposure, support design, cleaning, curing, geometry, environment, and measurement method.
Can resin-printed parts be used as final production parts?
Some resin workflows may support end-use or small-batch parts, but suitability depends on the resin’s documented properties, operating environment, load, expected service life, process control, and validation requirements.
Conclusion
So, how does resin 3D printing work? A digital model is sliced into layers, selected resin areas are solidified by controlled light exposure, and the build platform moves repeatedly until the complete geometry has formed. The part is then drained, washed, dried, support structures are removed, the part is post-cured, and the result is inspected.
The printer creates the geometry, but the complete workflow determines whether the part is suitable for its intended application. Resin compatibility, orientation, supports, exposure, vat condition, cleaning, curing, safety procedures, inspection, and production records all contribute to repeatable results.
For printer or workflow evaluation, contact Yidimu for project review and provide:
- Model size
- Resin requirement
- Intended application
- Expected printing and post-processing workflow
- Required quantity
- Sample-making or production needs
- Critical dimensions or surface requirements
Optional References
- ISO/ASTM 52900:2021 — Additive manufacturing: Fundamentals and vocabulary. The standard defines additive manufacturing as creating physical three-dimensional geometry through successive addition of material.
- NIOSH — Approaches to Safe 3D Printing. Includes explanations of vat photopolymerization, post-processing, chemical exposure considerations, ventilation, and protective equipment.
- FDA — Technical Considerations for Additive Manufactured Medical Devices. Provides process and testing considerations for additively manufactured medical devices.