When professional users compare resin 3D printers, they often focus on build volume, resolution, printing speed and resin type. These specifications are important, but they do not tell the full story. A resin 3D printer must also fit into the user’s software workflow.
A factory may already use CAD software for product development. A dental lab may use intraoral scan data, dental CAD software and case management tools. A model-making company may receive STL files from many customers. A research team may need to repeat the same print parameters across different test batches.
If the software workflow is not compatible, the printer may still be technically capable, but daily production becomes inefficient. Common problems include incorrect model scale, unsupported file types, missing printer profiles, wrong exposure settings, support failure, file transfer issues or inconsistent results between operators.
For this reason, resin 3D printer software compatibility should be checked before purchase, not after installation.
The Three Compatibility Layers: Model File, Slicer and Printer Output
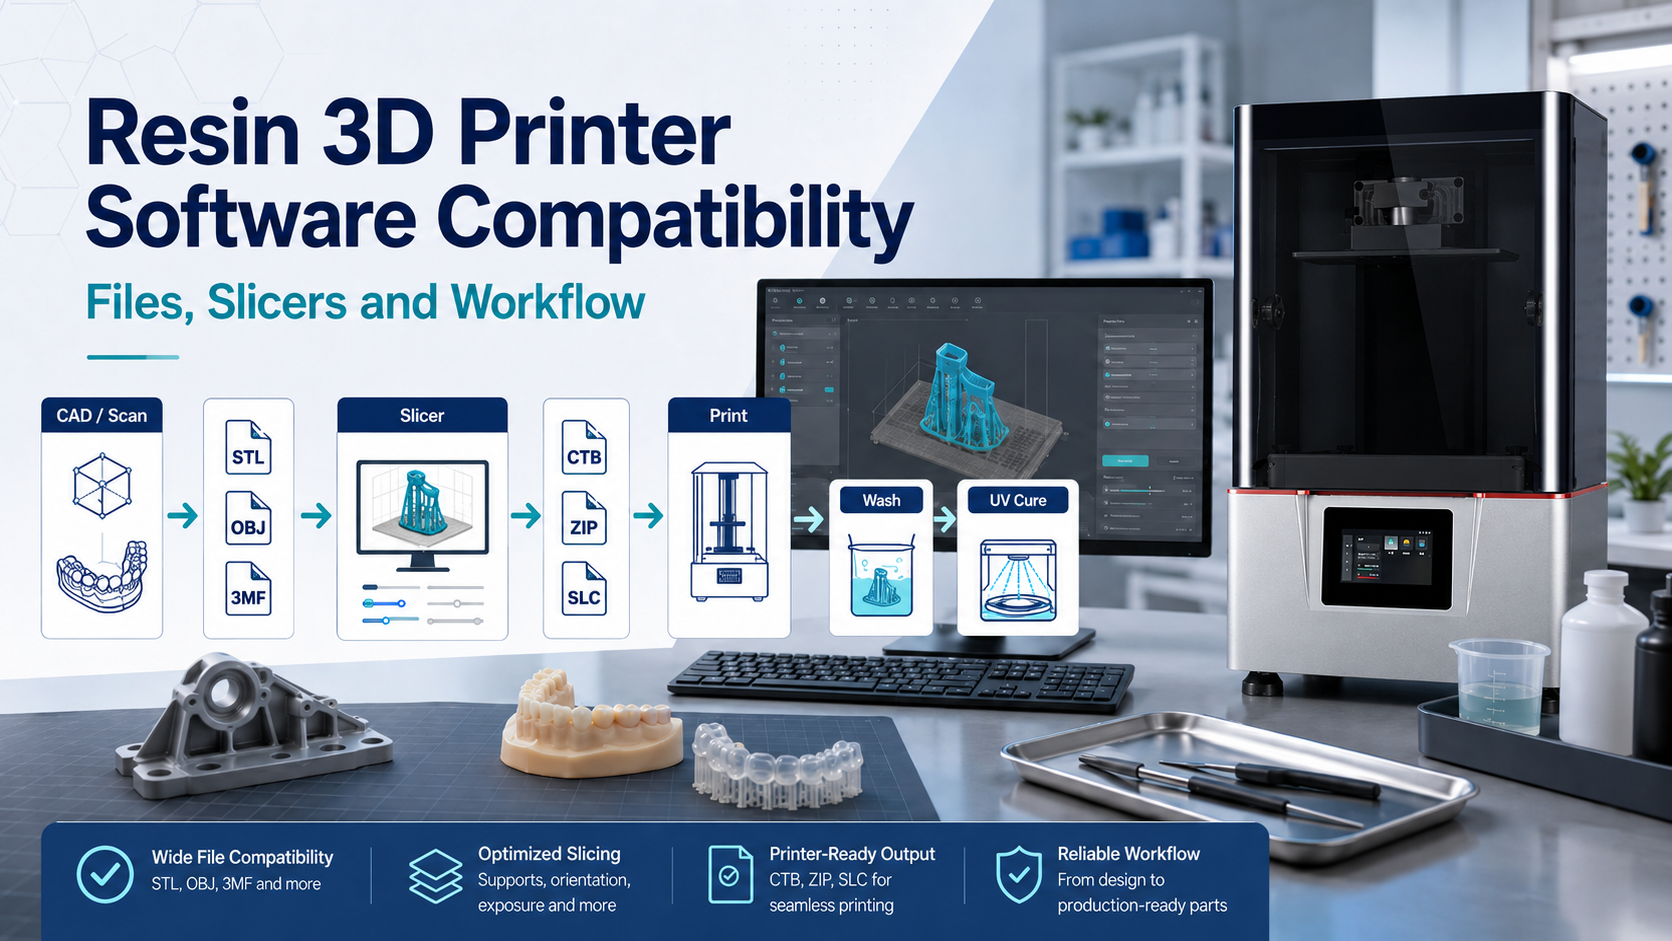
Professional resin 3D printing normally involves three software layers.
1. Design or Scan File
This is the file created by CAD software, dental design software, reverse engineering software or 3D scanning software. Examples include native CAD files, STEP files, STL files, OBJ files, PLY files or dental scan files.
Not every design file can be printed directly. Most resin 3D printers require a printable mesh file to be imported into slicing software.
2. Slicer Input File
The slicer accepts a 3D model file and prepares it for printing. Common slicer input formats include STL, OBJ and 3MF, depending on the slicer and printer profile.
At this stage, the operator adjusts:
- Model orientation
- Support structure
- Layer thickness
- Exposure time
- Bottom exposure
- Lift speed
- Rest time
- Anti-aliasing or smoothing settings
- Resin profile
- Hollowing and drain holes when needed
3. Printer-Readable Sliced File
After slicing, the software exports a machine-readable file. This file is not the same as the original STL or OBJ model. It contains layer images and printing instructions that the resin 3D printer can read.
Depending on the printer and slicer, the final output may use formats such as CTB, SLC, ZIP, CWS, SL1 or other formats. Professional users should always confirm which sliced file formats are supported by the exact printer model.
Practical Table: Common File Types in Resin 3D Printing
| File Type | Where It Is Used | Typical Role | Key Consideration for Professional Users |
|---|---|---|---|
| STL | CAD export, dental model export, slicer input | Basic mesh model for 3D printing | Very widely supported, but does not store color, material or detailed manufacturing metadata. Check scale and mesh quality. |
| OBJ | 3D modeling, dental and visual workflows, slicer input | Mesh file that may include additional surface information | Useful in some workflows, but compatibility varies by slicer and export settings. Test before production. |
| 3MF | Modern 3D printing workflows, slicer input or project exchange | More capable 3D manufacturing file format | Can support richer manufacturing data depending on software support. Confirm whether the slicer and printer profile handle it correctly. |
| STEP / STP | Engineering CAD workflow | CAD geometry exchange | Usually not printed directly on resin printers. Often converted to STL, OBJ or 3MF before slicing. |
| PLY | 3D scanning and some dental scan workflows | Mesh or scan data | May need conversion before slicing. Check whether texture or color data is required. |
| DICOM | Medical imaging workflow | Medical scan data | Not a direct resin printing file. Requires professional segmentation and validation before any medical or dental application. |
| CTB / SLC / ZIP / CWS / SL1 | Slicer output | Printer-readable sliced file | Must match the printer model and firmware requirements. Do not assume all resin printers accept the same sliced file. |
| CHITUBOX Project File | Slicer project | Stores layout, supports and settings | Useful for editing and repeat workflows, but not always the final print file. Keep version control in production. |
STL, OBJ and 3MF: Which One Should You Use?
For most professional resin 3D printing workflows, STL remains the most common file format because it is simple and widely supported. It is often enough for dental models, prototypes, fixtures, visual samples and engineering parts.
However, STL is only a surface mesh. It does not reliably carry all manufacturing metadata, color, material information or advanced project data. This is why professional users should not treat STL as a complete production record.
OBJ can be useful when the workflow involves surface data, visual models or certain scan exports. But OBJ compatibility may depend on how the file was exported and how the slicer reads it.
3MF is a more modern 3D printing file format. It can carry richer model and manufacturing information depending on the software environment. However, not every resin printer workflow uses 3MF as the final production standard. For a factory or dental lab, the practical question is not “Which file type is best in theory?” The better question is: “Which file type is stable in our software, slicer, printer profile and quality control workflow?”
How Slicer Compatibility Works
A resin slicer does more than open a model file. It converts the model into printable layers and machine instructions. This is why slicer compatibility is one of the most important parts of resin 3D printer software compatibility.
A slicer must support:
- The printer model or a correct custom printer profile
- The printer’s build volume
- XY resolution and pixel size
- Layer thickness range
- Resin exposure settings
- Lift and retract settings
- Sliced output file format
- Support generation
- Hollowing and drainage tools
- Preview and layer inspection
- Operating system used by the team
For Yidimu dental and industrial resin printer users, compatibility should be confirmed with the specific printer model. Some Yidimu dental printer workflows support CHITUBOX or CHITUBOX Pro, and supported file formats may include STL and OBJ depending on the model. Other machines may support different sliced file formats, so the printer model, slicer version and firmware should be checked together.
Why the Final Sliced File Matters
A common misunderstanding is that a resin 3D printer prints STL files directly. In most resin workflows, STL is only the model file. The slicer must convert the model into a printer-readable sliced file.
This matters because two resin printers may both accept STL in the slicer, but they may require different final print files. One machine may use CTB. Another may use SLC, ZIP or another sliced format. Even when the file extension looks familiar, the internal format may depend on the printer profile and firmware.
Professional users should avoid manually changing file extensions. A file named with a compatible extension is not always truly compatible. The safer approach is to use the correct slicer profile, export normally and test the file on the target printer before daily production.
Dental Workflow Compatibility
Dental resin 3D printing has stricter workflow requirements than general model printing because the output may be used for diagnostic models, surgical guides, splints, temporary restorations, denture-related parts or other dental applications depending on the resin and local rules.
A typical dental workflow may include:
- Intraoral scan or desktop scan
- Dental CAD design
- Export as STL, OBJ or another supported mesh format
- Import into slicer
- Select printer profile and resin profile
- Orient the model according to the application
- Add supports or use approved support strategy
- Slice and inspect layers
- Wash, dry and post-cure
- Remove supports and finish
- Inspect fit, surface and application-specific requirements
For dental applications, customers should confirm resin indication, post-curing process and local regulatory requirements before clinical or intraoral use. Software compatibility alone does not make a printed part suitable for patient use. The resin, printer, slicer settings, curing equipment, cleaning method and regulatory requirements must be considered together.
Factory and Engineering Workflow Compatibility
Factories and engineering teams often use resin 3D printing for prototypes, fit-check parts, small mechanisms, appearance samples, mold-development references, flexible test parts, jigs, fixtures and pre-production validation.
In these workflows, compatibility is less about dental case software and more about CAD data control.
A typical engineering workflow may include:
- CAD design in engineering software
- Export STEP for internal design archive
- Export STL or 3MF for slicing
- Check mesh resolution and wall thickness
- Import into slicer
- Select the resin profile based on application
- Orient for accuracy, strength or surface finish
- Add supports and drainage when needed
- Slice and save the correct machine file
- Print and post-process
- Measure critical dimensions
- Record print settings for repeat production
For factories, the best workflow keeps the original CAD file, the exported mesh file, the slicer project and the final sliced file organized by project version. This makes it easier to repeat a successful job, diagnose failures and control production changes.
Model-Making and Small-Batch Workflow Compatibility
Model-making companies often receive files from many customers. This creates more compatibility risk because the file source is not always controlled.
Before quoting or printing, the team should check:
- File type
- Model scale
- Mesh integrity
- Wall thickness
- Unsupported islands
- Hollow structures
- Drain holes
- Part orientation
- Surface detail requirements
- Resin requirement
- Expected post-processing finish
For production users, a file intake checklist can reduce wasted printing time. A customer-supplied STL may look correct on screen but still contain non-manifold edges, inverted normals, open shells or thin features that fail during printing.
Resin Profile Compatibility
Software compatibility is not only about file format. The slicer settings must also match the resin material.
Different resins may require different:
- Normal exposure time
- Bottom exposure time
- Layer thickness
- Lift speed
- Rest time
- Support density
- Cleaning method
- UV curing time
- Temperature control
- Post-curing equipment
A model resin, surgical guide resin, flexible resin and casting resin should not be treated as the same material. Even if the printer and slicer can open the file, incorrect resin settings may cause poor detail, weak supports, cracking, deformation, surface tackiness or failed prints.
For professional users, resin profiles should be tested and documented under the actual production environment. Room temperature, resin viscosity, vat condition, LCD condition and post-curing process may all affect the final result.
Operating System and Team Workflow
Another practical factor is operating system compatibility. Many professional teams use Windows workstations, while some design teams use macOS or Linux environments. The key question is not only whether the slicer can be installed. The team should also consider whether the full workflow is stable.
Check the following:
- Which operating systems are officially supported by the slicer
- Whether the printer profile is available in that slicer version
- Whether the team can open older project files after software updates
- Whether the same settings can be shared between operators
- Whether file names and folder paths work reliably across different computers
- Whether the printer supports USB, WiFi or network file transfer
- Whether production files are backed up and version-controlled
For a single clinic or small lab, one workstation may be enough. For a factory or dental production center, standardization matters more. The team should define one approved slicer version, one folder structure and one setting record format.
Practical Workflow: How to Check Resin 3D Printer Software Compatibility Before Buying
Use this workflow before selecting a resin 3D printer.
Step 1: List Your Current Software
Write down the software your team already uses:
- CAD software
- Dental CAD/CAM software
- 3D scanning software
- Mesh repair software
- Slicer software
- Quality inspection software
- Case management or production management software
Step 2: Identify Your Export Formats
Confirm which formats your design software can export. For resin printing, STL and OBJ are commonly used. 3MF may be useful if supported by your slicer. STEP is useful for engineering exchange but usually requires conversion before slicing.
Step 3: Confirm Slicer Support
Ask whether the printer supports your preferred slicer. If the printer requires a specific slicer, confirm whether your team can use it comfortably.
Check:
- Printer profile availability
- Supported input files
- Supported sliced output files
- Resin setting control
- Support generation tools
- Layer preview
- Operating system support
Step 4: Confirm Printer File Format
Do not stop at STL support. Confirm the final printer-readable format. Ask which file format the printer reads after slicing and whether the format depends on firmware version.
Step 5: Test Real Files
Use your own files, not only demo models. A dental lab should test actual dental models or guide cases. A factory should test real prototype parts with critical dimensions. A model-making company should test detailed customer-style models.
Step 6: Validate Resin and Post-Processing
Confirm that the slicer profile, printer, resin, cleaning method and UV curing process work together. For dental use, confirm resin indication and local requirements before clinical or intraoral use.
Step 7: Document a Standard Workflow
Once the test is successful, document:
- Software version
- Printer model
- Resin type and batch record
- Layer thickness
- Exposure settings
- Support strategy
- Cleaning time
- Drying time
- UV curing settings
- Inspection method
- File naming rules
This documentation helps improve repeatability and training.
Software Compatibility Checklist
Before adding a resin 3D printer to a professional workflow, confirm the following:
- The printer supports your target applications.
- The slicer supports the printer model or a verified profile.
- Your design software can export STL, OBJ or another supported format.
- The slicer can import your file type correctly.
- The final sliced file format is supported by the printer.
- The build volume matches your part size and batch layout.
- Resin settings can be adjusted and saved.
- The resin profile is suitable for the application.
- Dental applications have confirmed resin indication and regulatory requirements.
- Operators can use the slicer on the required operating system.
- File transfer method is practical for daily production.
- Test prints have been completed using real production files.
- Critical dimensions or fit requirements have been inspected.
- The workflow is documented for repeat orders.
Common Mistakes to Avoid
Mistake 1: Assuming STL Support Means Full Compatibility
STL support is important, but it is only one part of the workflow. The slicer must still generate a machine-readable file for the printer.
Mistake 2: Using the Wrong Printer Profile
A wrong printer profile can create incorrect layer images, wrong build size, wrong exposure behavior or failed prints. Always use the correct profile for the exact printer model.
Mistake 3: Ignoring Resin Settings
Different resins need different exposure and post-processing settings. Using a generic setting may work for simple models but can fail in professional production.
Mistake 4: Changing File Extensions Manually
Renaming a file does not convert it. A CTB, SLC, ZIP or other sliced file must be exported correctly by compatible software.
Mistake 5: Not Testing Real Production Files
Demo files are often optimized. Real dental models, engineering prototypes and customer models may reveal issues with orientation, supports, wall thickness or file quality.
Mistake 6: Treating Dental Compatibility as Only a Software Question
For dental use, software compatibility is only part of the requirement. Resin indication, post-curing process, cleaning procedure and local regulatory requirements must be confirmed before clinical or intraoral use.
Mistake 7: Updating Software Without Version Control
Slicer updates may change profiles, settings or file behavior. Production teams should document software versions and test critical jobs after updates.
Mistake 8: Forgetting Post-Processing in the Workflow
A sliced file may print successfully, but the final part can still fail due to poor washing, insufficient drying, incorrect UV curing or aggressive support removal.
How Yidimu Helps Professional Users Build a Compatible Workflow
Yidimu provides industrial resin 3D printers, dental 3D printers, flexible resin 3D printers, UV curing boxes, 3D printing resins and technical support for professional users.
For software compatibility, Yidimu can help customers review:
- Application type
- Model size
- Expected build volume
- Current design software
- Required file formats
- Preferred slicer workflow
- Resin material requirement
- Printing speed and accuracy expectations
- Post-processing method
- Dental application requirements where relevant
- Operator training needs
The goal is not only to choose a printer. The goal is to build a practical workflow from design file to finished part.
Conclusion
Resin 3D printer software compatibility is not a single checkbox. It includes model file formats, slicer support, printer profiles, sliced output formats, resin settings, operating system support, file transfer method and post-processing workflow.
For factories, dental labs, clinics, model-making companies and R&D teams, the best approach is to test the complete workflow before production. Confirm whether your files can move from CAD or dental design software into the slicer, whether the slicer can export the correct printer-readable format, and whether the resin and post-curing process can support the intended application.
If you are evaluating resin 3D printer software compatibility for a Yidimu workflow, contact Yidimu with your model size, resin requirement, application and expected workflow. The Yidimu team can help review the printer model, slicer setup, file format and post-processing plan before you move into regular production.
FAQ
What file format do resin 3D printers use?
Most resin 3D printer workflows start with STL, OBJ or sometimes 3MF files in the slicer. After slicing, the printer usually reads a machine-specific sliced file such as CTB, SLC, ZIP, CWS, SL1 or another supported format. The exact format depends on the printer model, slicer and firmware.
Can a resin 3D printer print STL files directly?
Usually, no. STL is normally imported into slicing software first. The slicer converts the model into layers and exports a printer-readable file. Professional users should confirm the final sliced format supported by their printer.
Is STL or OBJ better for resin 3D printing?
STL is more commonly used for resin 3D printing because it is simple and widely supported. OBJ can also work in some workflows, especially when exported from modeling or scan software. The best choice depends on the slicer and printer profile. For production, test the actual file before printing batches.
Is 3MF useful for resin 3D printing?
3MF can be useful because it is designed for richer 3D printing data exchange. However, resin workflow support depends on the slicer, printer profile and production process. Users should confirm whether 3MF is supported as an input file and whether it improves their actual workflow.
What slicer software is used for resin 3D printers?
Many resin printers use slicers such as CHITUBOX, CHITUBOX Pro or other resin slicing software, depending on the printer model. The important point is to confirm that the slicer supports the exact printer profile, resin settings and output file format.
Why does my resin printer not read my file?
Common causes include using the wrong sliced file format, selecting the wrong printer profile, saving the project file instead of the print file, using an unsupported USB format, changing the file extension manually, or using firmware that does not match the slicer output.
Can dental scan files be printed directly?
Dental scan data usually needs to pass through dental design software and slicing software before printing. The printable file may be exported as STL, OBJ or another supported format. For clinical or intraoral dental use, customers should confirm resin indication, post-curing process and local regulatory requirements.
Do resin settings affect software compatibility?
Yes. A file may open correctly, but the print can still fail if exposure, lift speed, layer thickness, support settings or post-curing process do not match the resin. Software compatibility should always be checked together with material compatibility.
Should factories keep slicer project files?
Yes. For repeat production, it is useful to keep the original CAD file, exported mesh file, slicer project file and final sliced file. This helps with version control, troubleshooting and repeat orders.
What should I send to Yidimu when asking about compatibility?
Send your application, model size, sample file format, preferred slicer, resin requirement, expected accuracy, batch quantity and post-processing method. For dental applications, also describe whether the part is for a model, guide, splint, temporary restoration or another intended use.