When people ask what is the best infill pattern for 3D printing, they usually expect one simple answer. In real production, there is no universal best pattern. The best choice depends on whether the part is a visual model, dental model, flexible prototype, engineering sample, assembly test part, fixture, or lightweight structure.
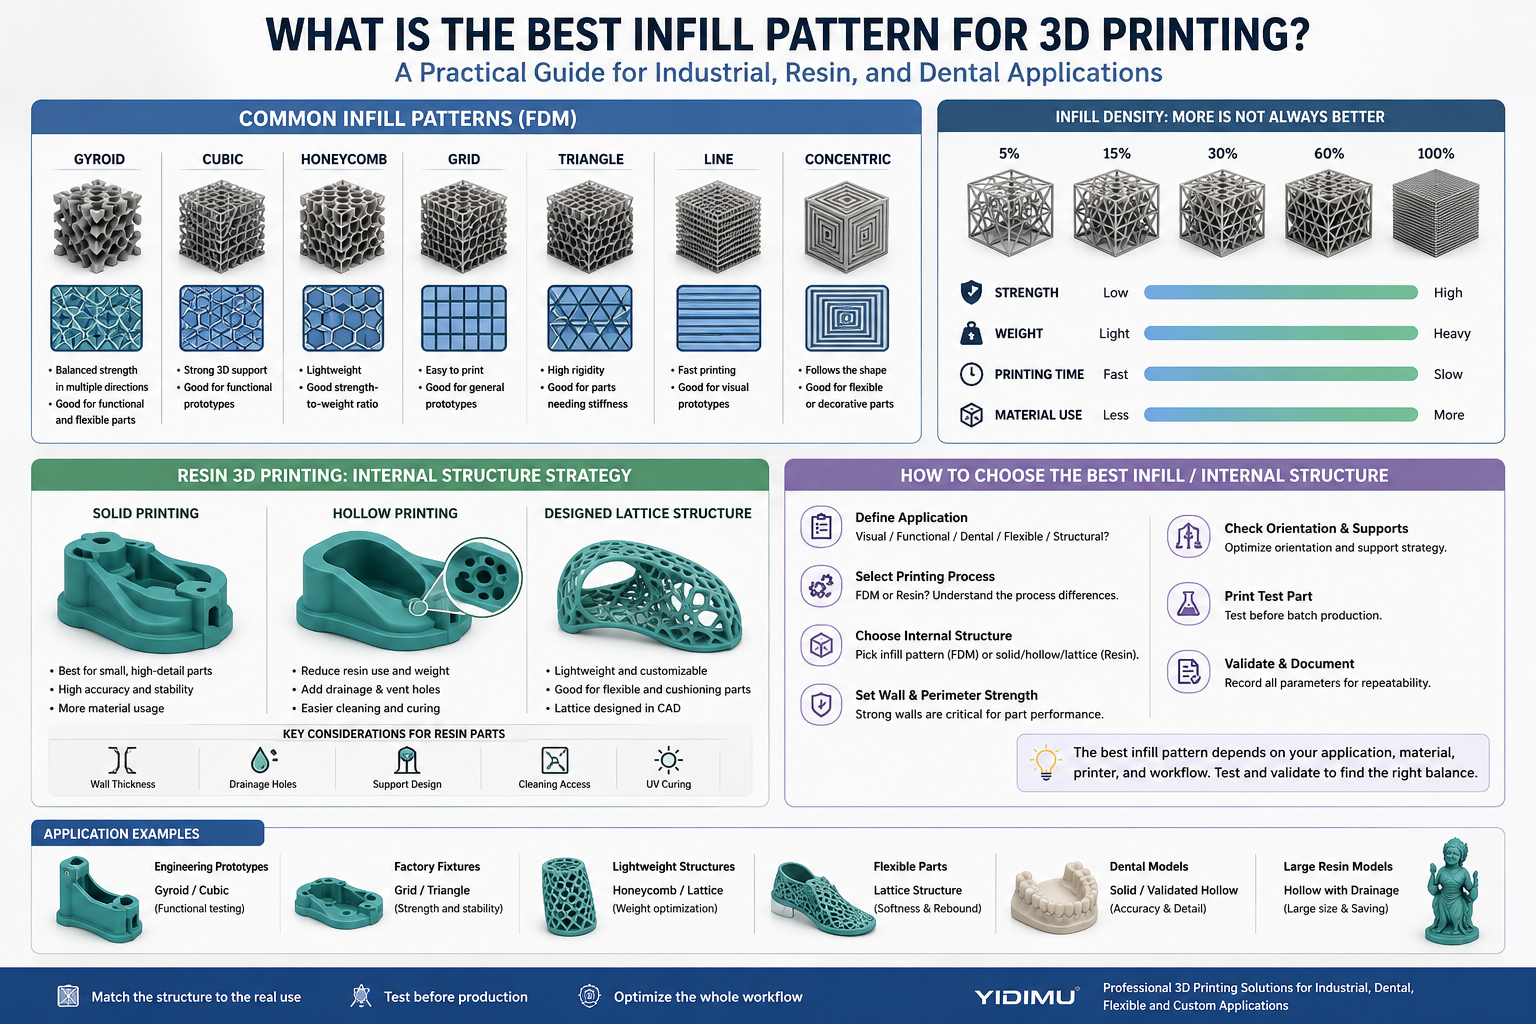
Infill affects several practical factors:
- Part strength
- Weight
- Material consumption
- Printing time
- Surface stability
- Risk of trapped material
- Post-processing difficulty
- Deformation behavior
- Cost per part
- Repeatability across batches
Research on FDM printing shows that infill type, infill density, print orientation, layer height, and wall/perimeter settings can all influence the mechanical properties of printed parts. Infill is not an isolated setting; it works together with the whole printing process.
For factories, dental labs, and professional model-making teams, the better question is not simply “Which pattern is strongest?” It is:
Which internal structure gives the part enough strength, detail, stability, post-processing reliability, and cost efficiency for this specific workflow?
That is especially important for users evaluating an industrial resin 3D printer or a professional resin printing workflow. Resin printing does not always follow the same infill logic as filament printing.
Infill Pattern vs. Infill Density: What Is the Difference?
Before choosing a pattern, it helps to separate two settings.
Infill pattern refers to the internal geometry inside the part. Examples include gyroid, grid, cubic, honeycomb, triangle, line, zigzag, concentric, and custom lattice structures.
Infill density refers to how much of the internal volume is filled. A 15% infill part is mostly hollow inside. A 60% infill part has much more internal material. A 100% infill part is close to solid, depending on slicer settings and material behavior.
In many production cases, density may have a larger effect on strength and weight than the pattern alone. A strong pattern at very low density may still fail under load. A simple pattern at higher density may perform better for certain use cases. Studies comparing infill patterns and volume percentages show that pattern and percentage can affect part mass, manufacturing time, and mechanical response.
For professional users, infill decisions should be made together with:
- Wall thickness
- Number of perimeters
- Layer height
- Print orientation
- Resin or filament type
- Support strategy
- Post-curing process
- Cleaning method
- Required tolerance
- Load direction
- Final application environment
Best Infill Pattern by Application
The table below gives a practical starting point. It should not replace validation testing, but it can help engineering teams narrow the first trial settings.
| Application | Recommended Internal Structure | Why It Works | Notes for Professional Users |
|---|---|---|---|
| Visual appearance prototype | Line, grid, low-density infill, or hollow resin print | Fast, low material use, enough for shape review | Prioritize surface finish and dimensional appearance |
| Engineering fit-check model | Grid, cubic, or solid/hollow resin model | Better dimensional support than very sparse infill | Confirm assembly points, screw holes, clips, and contact surfaces |
| Functional FDM-style test part | Gyroid, cubic, triangle, or grid | Better load distribution than simple low-density line infill | Test with real load direction before production use |
| Lightweight structure | Gyroid, honeycomb, cubic, or designed lattice | Reduces weight while keeping internal support | Useful for prototypes, fixtures, cushioning, and wearable samples |
| Flexible prototype | Gyroid-like lattice or custom lattice design | Can support deformation and rebound behavior | Especially relevant for soft resin and elastomer workflows |
| Dental model | Usually solid or validated hollow resin workflow | Prioritizes accuracy, surface detail, and post-processing control | Confirm resin indication, curing, and local regulatory requirements |
| Large resin model | Hollow structure with controlled wall thickness and drainage | Reduces resin use and stress while improving cleaning | Drainage and curing access are critical |
| Factory sample / product review model | Solid, hollow, or lattice depending on size and use | Balances appearance, cost, and handling strength | Match structure to inspection purpose |
Common Infill Patterns and When to Use Them
1. Gyroid Infill
Gyroid is often one of the best all-around infill patterns for functional 3D printing. It has a continuous, wave-like internal structure that can distribute stress in multiple directions. It is commonly chosen when users want a balance of strength, flexibility, and reduced weight.
Gyroid may be suitable for:
- Functional prototypes
- Lightweight parts
- Parts with multi-directional load
- Flexible structures
- Cushioning concepts
- Wearable prototypes
- Engineering samples
For flexible resin applications, the idea is often not “standard slicer gyroid infill” but a designed lattice or gyroid-like geometry built into the CAD model. This is especially useful for shoe sample development, soft padding, wearable protection, and elastic model testing. Yidimu’s flexible resin 3D printer is positioned for professional elastomer resin workflows where structure, softness, rebound feel, and shape verification may all matter.
Gyroid is not always the fastest pattern. It may increase slicing complexity and print time depending on the process. For simple display models, it may be more than necessary.
2. Grid Infill
Grid infill is simple, common, and easy to understand. It uses crossing lines to create a regular internal structure. It is often used for general prototypes, fit-check models, and parts that do not require advanced load optimization.
Grid may be suitable for:
- Basic prototypes
- Factory sample models
- Assembly checks
- Non-critical fixtures
- General mechanical review parts
Its main advantage is practicality. It is easy to print and often gives enough internal support for routine applications. The limitation is that it may create stress concentration in certain directions, depending on geometry and load.
For purchasing teams, grid infill can be a good first test setting when evaluating material use, part handling, and print speed.
3. Cubic Infill
Cubic infill creates a three-dimensional internal pattern. Compared with simple line or grid infill, cubic patterns can provide better support in multiple directions. This makes it a useful option for functional prototypes and parts that may experience load from different angles.
Cubic may be suitable for:
- Engineering prototypes
- Functional test samples
- Parts requiring better internal support
- Factory tools or non-critical jigs
- Medium-strength printed components
Cubic is often a safer choice than low-density line infill when the part must be handled repeatedly or tested in an assembly. However, it can use more material and time than simpler patterns.
4. Honeycomb Infill
Honeycomb infill is known for lightweight strength. Its cell-like structure can provide good strength-to-weight performance, especially when the load direction and print process are suitable.
Honeycomb may be suitable for:
- Lightweight prototypes
- Larger non-solid parts
- Industrial design models
- Cushioning and structural concepts
- Parts where weight reduction matters
The drawback is speed. Honeycomb can be slower to print or more complex to prepare depending on the machine and slicer. For resin workflows, honeycomb should usually be treated as a designed lattice or internal model geometry rather than a casual default setting.
5. Triangle Infill
Triangle infill can provide relatively rigid internal support. It may be useful for parts that need stiffness and shape retention.
Triangle may be suitable for:
- Rigid prototypes
- Brackets
- Test samples
- Parts with relatively predictable loads
- Models requiring stronger internal bracing
The main limitation is that it may not be the best choice for flexible parts or parts that need smooth deformation.
6. Line or Rectilinear Infill
Line infill is one of the fastest and simplest options. It is useful when the part is mostly for appearance, volume review, or early design communication.
Line infill may be suitable for:
- Early prototypes
- Concept models
- Visual samples
- Low-load parts
- Fast internal review models
It is not ideal for parts that need strength from multiple directions. If the part may be drilled, clamped, loaded, or repeatedly assembled, line infill may be too weak unless density and wall settings are increased.
7. Concentric Infill
Concentric infill follows the outer shape of the model. It can be useful for decorative parts, flexible shells, and parts where the outer contour matters more than internal load distribution.
Concentric may be suitable for:
- Display models
- Thin shell-like parts
- Flexible outer forms
- Cosmetic prototypes
- Non-structural geometry review
For industrial users, concentric infill should be used carefully. It may not provide enough strength for mechanical testing unless the design is validated.
For Resin 3D Printing: Traditional Infill Is Not Always the Right Concept
This is the most important point for Yidimu customers.
In FDM printing, infill is a normal slicer setting because the nozzle deposits thermoplastic material along toolpaths. In resin 3D printing, especially LCD light-curing or vat photopolymerization workflows, the process is different. Additive manufacturing standards describe AM as building physical 3D geometries by successive addition of material, but different process categories use different material and curing mechanisms.
Professional resin users usually think in terms of:
- Solid print
- Hollow print
- Wall thickness
- Drainage holes
- Vent holes
- Support placement
- Orientation
- Resin viscosity
- UV penetration and post-curing
- Internal cleaning access
- Designed lattice geometry
For a small high-detail resin model, solid printing may be simpler and more stable. For a large model, hollowing may reduce resin use, weight, suction force, and stress. For a flexible part, a custom lattice may help tune softness and rebound behavior.
This is why users evaluating Yidimu resin 3D printers should not simply copy FDM infill advice. A resin part may fail not because the “pattern” was wrong, but because the wall thickness, drainage, cleaning, curing, orientation, or resin selection was not suitable.
Resin Printing: Solid, Hollow, or Lattice?
Solid Resin Printing
Solid resin printing is often useful for small models, high-detail parts, dental models, jewelry patterns, and samples where surface quality and dimensional stability matter more than resin saving.
Solid printing may be suitable when:
- The part is small
- Accuracy is important
- The model has fine details
- The internal volume is limited
- Cleaning hollow interiors would be difficult
- The part must be handled repeatedly
The disadvantage is material consumption. Large solid resin models can become heavy, expensive, and more difficult to cure evenly.
Hollow Resin Printing
Hollowing is often used for larger resin models. It reduces resin usage and part weight, but it introduces new workflow requirements.
A hollow resin part should usually include:
- Proper wall thickness
- Drainage holes
- Vent holes if needed
- Cleaning access
- Enough curing exposure
- Correct orientation
- Support strategy
- Inspection for trapped uncured resin
For large industrial models produced on an industrial resin 3D printer, hollowing can be practical, but only when the inside can be cleaned and post-cured according to the resin and application requirements.
Designed Lattice Structures
A lattice is different from casual slicer infill. It is usually part of the CAD design or a controlled engineering structure. Lattice design can help tune weight, stiffness, flexibility, cushioning, and deformation behavior.
Designed lattice structures may be useful for:
- Flexible shoe components
- Soft protective structures
- Wearable prototypes
- Lightweight industrial samples
- Ergonomic models
- Cushioning tests
- Product development experiments
For flexible resin printing, lattice design may matter more than simply choosing “gyroid” inside a slicer. The real question is how the structure behaves under compression, bending, twisting, and repeated handling.
What Is the Best Infill Pattern for Dental 3D Printing?
For dental resin 3D printing, the best internal structure is usually not a general-purpose infill pattern. Dental workflows often prioritize:
- Dimensional accuracy
- Surface detail
- Stable model bases
- Clear margins and contact areas
- Clean post-processing
- Resin indication
- Curing consistency
- Traceable workflow settings
For dental models, users may choose solid or carefully hollowed models depending on the model size, resin, software workflow, and lab preference. For surgical guide models, splint-related models, orthodontic models, and temporary dental workflows, users should avoid casual internal structure changes unless the resin and workflow allow it.
Customers should confirm resin indication, post-curing process and local regulatory requirements before clinical or intraoral use.
Yidimu’s dental 3D printing solutions are intended for professional dental model workflows, dental labs, clinics, and digital dentistry users who need equipment, resin, curing, and workflow support together.
Recommended Infill and Internal Structure Selection Workflow
Use this practical workflow before deciding on an infill pattern or resin internal structure.
Step 1: Define the real application
Ask what the part must do.
- Is it only for visual review?
- Does it need to fit into an assembly?
- Will it be loaded, clamped, drilled, or bent?
- Is it a dental model or dental workflow part?
- Is it flexible, rigid, transparent, castable, or temporary?
- Will it be used only once or repeatedly?
Step 2: Identify the printing process
Do not use the same logic for every printer.
- FDM: choose infill pattern, infill density, wall count, and orientation.
- Resin: choose solid, hollow, wall thickness, drainage, support, and curing workflow.
- Flexible resin: consider designed lattice geometry and deformation behavior.
- Dental resin: follow resin indication, workflow instructions, and regulatory requirements.
Step 3: Choose a starting structure
For general FDM-style functional parts, start with gyroid, cubic, or grid.
For visual prototypes, start with line or grid.
For large resin parts, test hollowing with safe wall thickness and drainage.
For flexible samples, test lattice geometry.
For dental models, start with a validated resin workflow rather than casual infill changes.
Step 4: Set wall thickness and perimeter strength
Many failed parts are not caused by the infill pattern. They fail because the walls are too thin. Walls, shells, and perimeters often carry much of the external load.
For resin printing, wall thickness also affects cleaning, curing, deformation, and long-term stability. Thin walls may deform. Very thick sections may require more careful curing.
Step 5: Check orientation and supports
Orientation affects strength, surface finish, suction force, support marks, and dimensional accuracy. In resin printing, orientation can also affect resin flow and cleaning quality.
Step 6: Print a test part before batch production
For professional use, never move directly from one slicer setting to production. Print a small test part or representative section first.
Check:
- Dimensional accuracy
- Surface finish
- Support removal quality
- Internal cleaning
- Post-curing result
- Flexibility or rigidity
- Assembly fit
- Weight
- Failure points
Step 7: Document the final workflow
For factories and labs, record:
- Printer model
- Resin type
- Layer thickness
- Exposure settings
- Orientation
- Support strategy
- Hollowing or lattice settings
- Wall thickness
- Cleaning method
- UV curing time and equipment
- Inspection result
Yidimu’s UV curing boxes can support a more controlled post-curing stage for resin printed models, but users should still match curing settings to the resin and application.
Practical Checklist: Choosing the Best Infill Pattern
Use this checklist before finalizing a part.
- Confirm whether the part is printed by FDM or resin technology.
- Define whether the part is visual, functional, dental, flexible, or structural.
- Identify the expected load direction.
- Choose gyroid or cubic for balanced functional testing.
- Choose grid or line for fast visual prototypes.
- Choose honeycomb or lattice for lightweight structure testing.
- Use solid or controlled hollowing for resin parts instead of assuming FDM-style infill.
- Add drainage holes for hollow resin parts where appropriate.
- Confirm wall thickness before reducing material.
- Match the resin to the application.
- Confirm cleaning and UV post-curing steps.
- Test one sample before batch printing.
- Record settings for repeatability.
- For dental applications, confirm resin indication and local requirements.
Common Mistakes to Avoid
1. Assuming the strongest infill pattern is always the best
The strongest option may also be slower, heavier, more expensive, or unnecessary. A visual model does not need the same internal structure as a load-bearing test part.
2. Copying FDM infill settings into resin printing
This is a common mistake. Resin printing usually requires a different decision process: solid vs. hollow, wall thickness, drainage, support, cleaning, and curing.
3. Using low infill with thin walls
A low-density infill part with thin walls may feel weak even if the pattern name sounds strong. Wall count and shell thickness are often critical.
4. Hollowing resin parts without drainage
A hollow resin part without proper drainage may trap uncured resin. This can create cleaning problems, odor, cracking, leakage, or long-term stability issues.
5. Ignoring post-curing
For resin parts, printing is not the final step. Cleaning, drying, and UV post-curing can affect handling, surface condition, and final usability. Workplace safety guidance for 3D printing also emphasizes controls such as ventilation, administrative procedures, and personal protective equipment to help manage exposure risks.
6. Choosing infill only by percentage
Two parts with the same infill density can behave differently if the pattern, orientation, wall thickness, and material are different.
7. Skipping real application testing
A part that looks good after printing may still fail under bending, compression, heat, assembly pressure, or repeated handling. Test the part in the real use condition whenever possible.
Conclusion: What Is the Best Infill Pattern for 3D Printing?
The best infill pattern for 3D printing depends on the process and application. For general functional FDM-style parts, gyroid and cubic are often good starting points because they offer balanced internal support. For fast prototypes, grid or line may be enough. For lightweight structures, honeycomb or lattice can be useful. For resin 3D printing, the better decision is often not a standard infill pattern, but whether to use solid printing, hollowing, wall thickness control, drainage holes, or designed lattice geometry.
For professional users, the right structure should be selected together with resin type, model size, accuracy requirement, post-curing process, and expected workflow.
If you are choosing a resin 3D printing solution for factory samples, dental models, flexible parts, industrial prototypes, or professional model production, contact Yidimu with your model size, resin requirement, application, and expected workflow. Yidimu can help review suitable printer options, resin choices, UV curing needs, and sample printing support for your project.
FAQ
What is the strongest infill pattern for 3D printing?
For many functional 3D printed parts, gyroid, cubic, honeycomb, and triangle infill can provide stronger internal support than simple line infill. However, strength depends on material, density, wall thickness, print orientation, layer bonding, and load direction. There is no single strongest pattern for every part.
Is gyroid better than grid infill?
Gyroid is often better for balanced, multi-directional strength and flexible structures. Grid is simpler, faster, and practical for many prototypes. For early design models, grid may be enough. For functional testing, gyroid may be a better starting point.
What infill pattern should I use for functional prototypes?
For functional prototypes, start with gyroid, cubic, grid, or triangle infill. Then adjust infill density, wall thickness, and orientation based on the expected load. For resin functional prototypes, evaluate solid, hollow, or lattice design instead of relying only on FDM-style infill thinking.
What is the best infill percentage for 3D printing?
There is no universal percentage. Visual prototypes may use low infill. Functional parts may need medium or high infill. Small resin models may be printed solid. Large resin models may be hollowed with suitable wall thickness and drainage. The correct value should be tested against the part’s real use.
Does resin 3D printing use infill?
Resin 3D printing does not usually use infill in the same way as FDM printing. Resin parts are often printed solid, hollowed, or designed with lattice structures. For large models, hollowing and drainage may matter more than choosing a standard infill pattern.
Should dental 3D printed models be hollow or solid?
Dental models may be solid or hollow depending on the software workflow, resin, model design, lab process, and application. Customers should confirm resin indication, post-curing process and local regulatory requirements before clinical or intraoral use.
What infill is best for flexible 3D printing?
Flexible parts often benefit from gyroid-like, honeycomb, or custom lattice structures because the internal geometry can affect softness, rebound, cushioning, and deformation. For flexible resin printing, the structure is often designed into the model rather than selected as a basic slicer infill preset.
Is 100% infill always the strongest?
Not always. 100% infill can increase weight, print time, material use, and internal stress. In some cases, better wall thickness, orientation, or a suitable lattice can perform better for the application. For resin printing, fully solid parts may also require careful curing depending on size and resin.
How do I choose infill for a factory prototype?
Start by defining the prototype’s purpose. For appearance review, use a faster, lighter structure. For assembly testing, increase wall strength and choose grid or cubic. For functional testing, try gyroid, cubic, or higher-density settings. For resin printing, review solid vs. hollow vs. lattice structure and confirm the post-processing workflow.
Can Yidimu help test the right resin 3D printing workflow?
Yes. Yidimu can help professional users review printer size, resin type, model structure, UV curing requirements, and workflow steps. Customers can also discuss sample printing before selecting equipment for regular production.
Optional References
- ISO/ASTM 52900:2021, additive manufacturing fundamentals and vocabulary.
- Research on how infill pattern, density, orientation, layer height, and perimeter settings affect printed part properties.
- Research comparing infill patterns and volume percentages in FDM printing.
- NIOSH-related safe 3D printing guidance summarized by ANSI, including ventilation, administrative controls, and personal protective equipment.