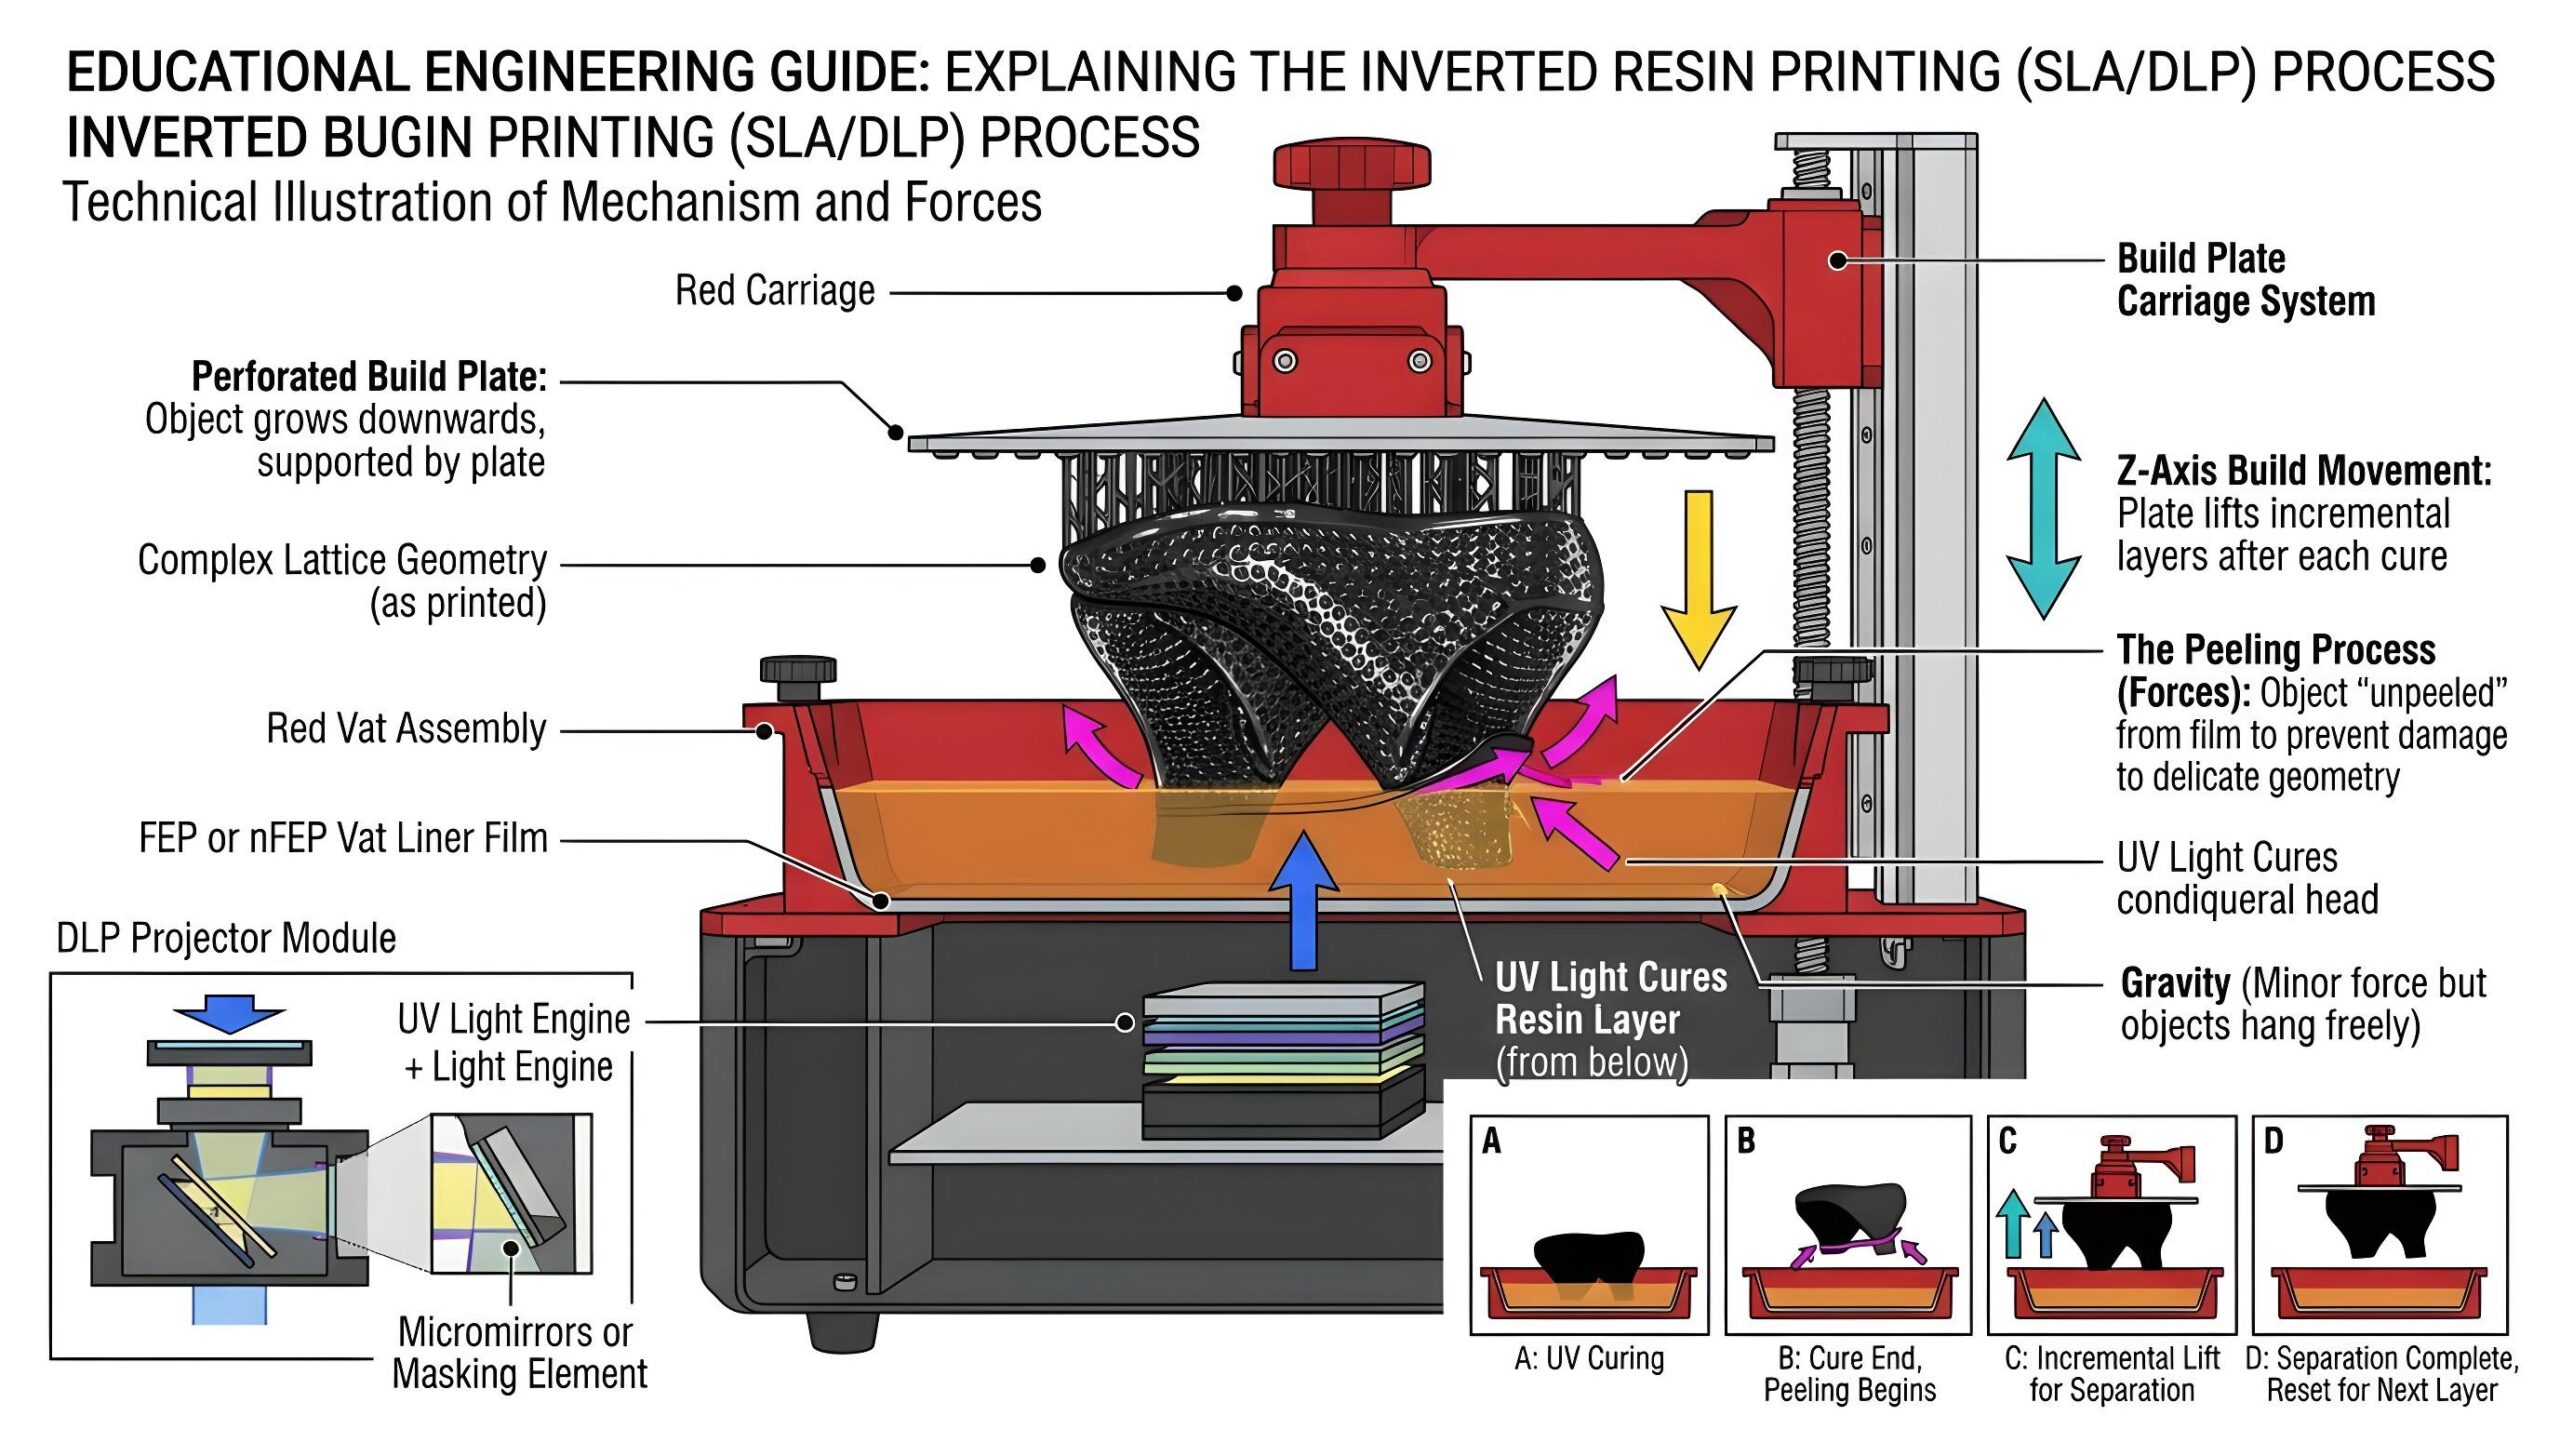
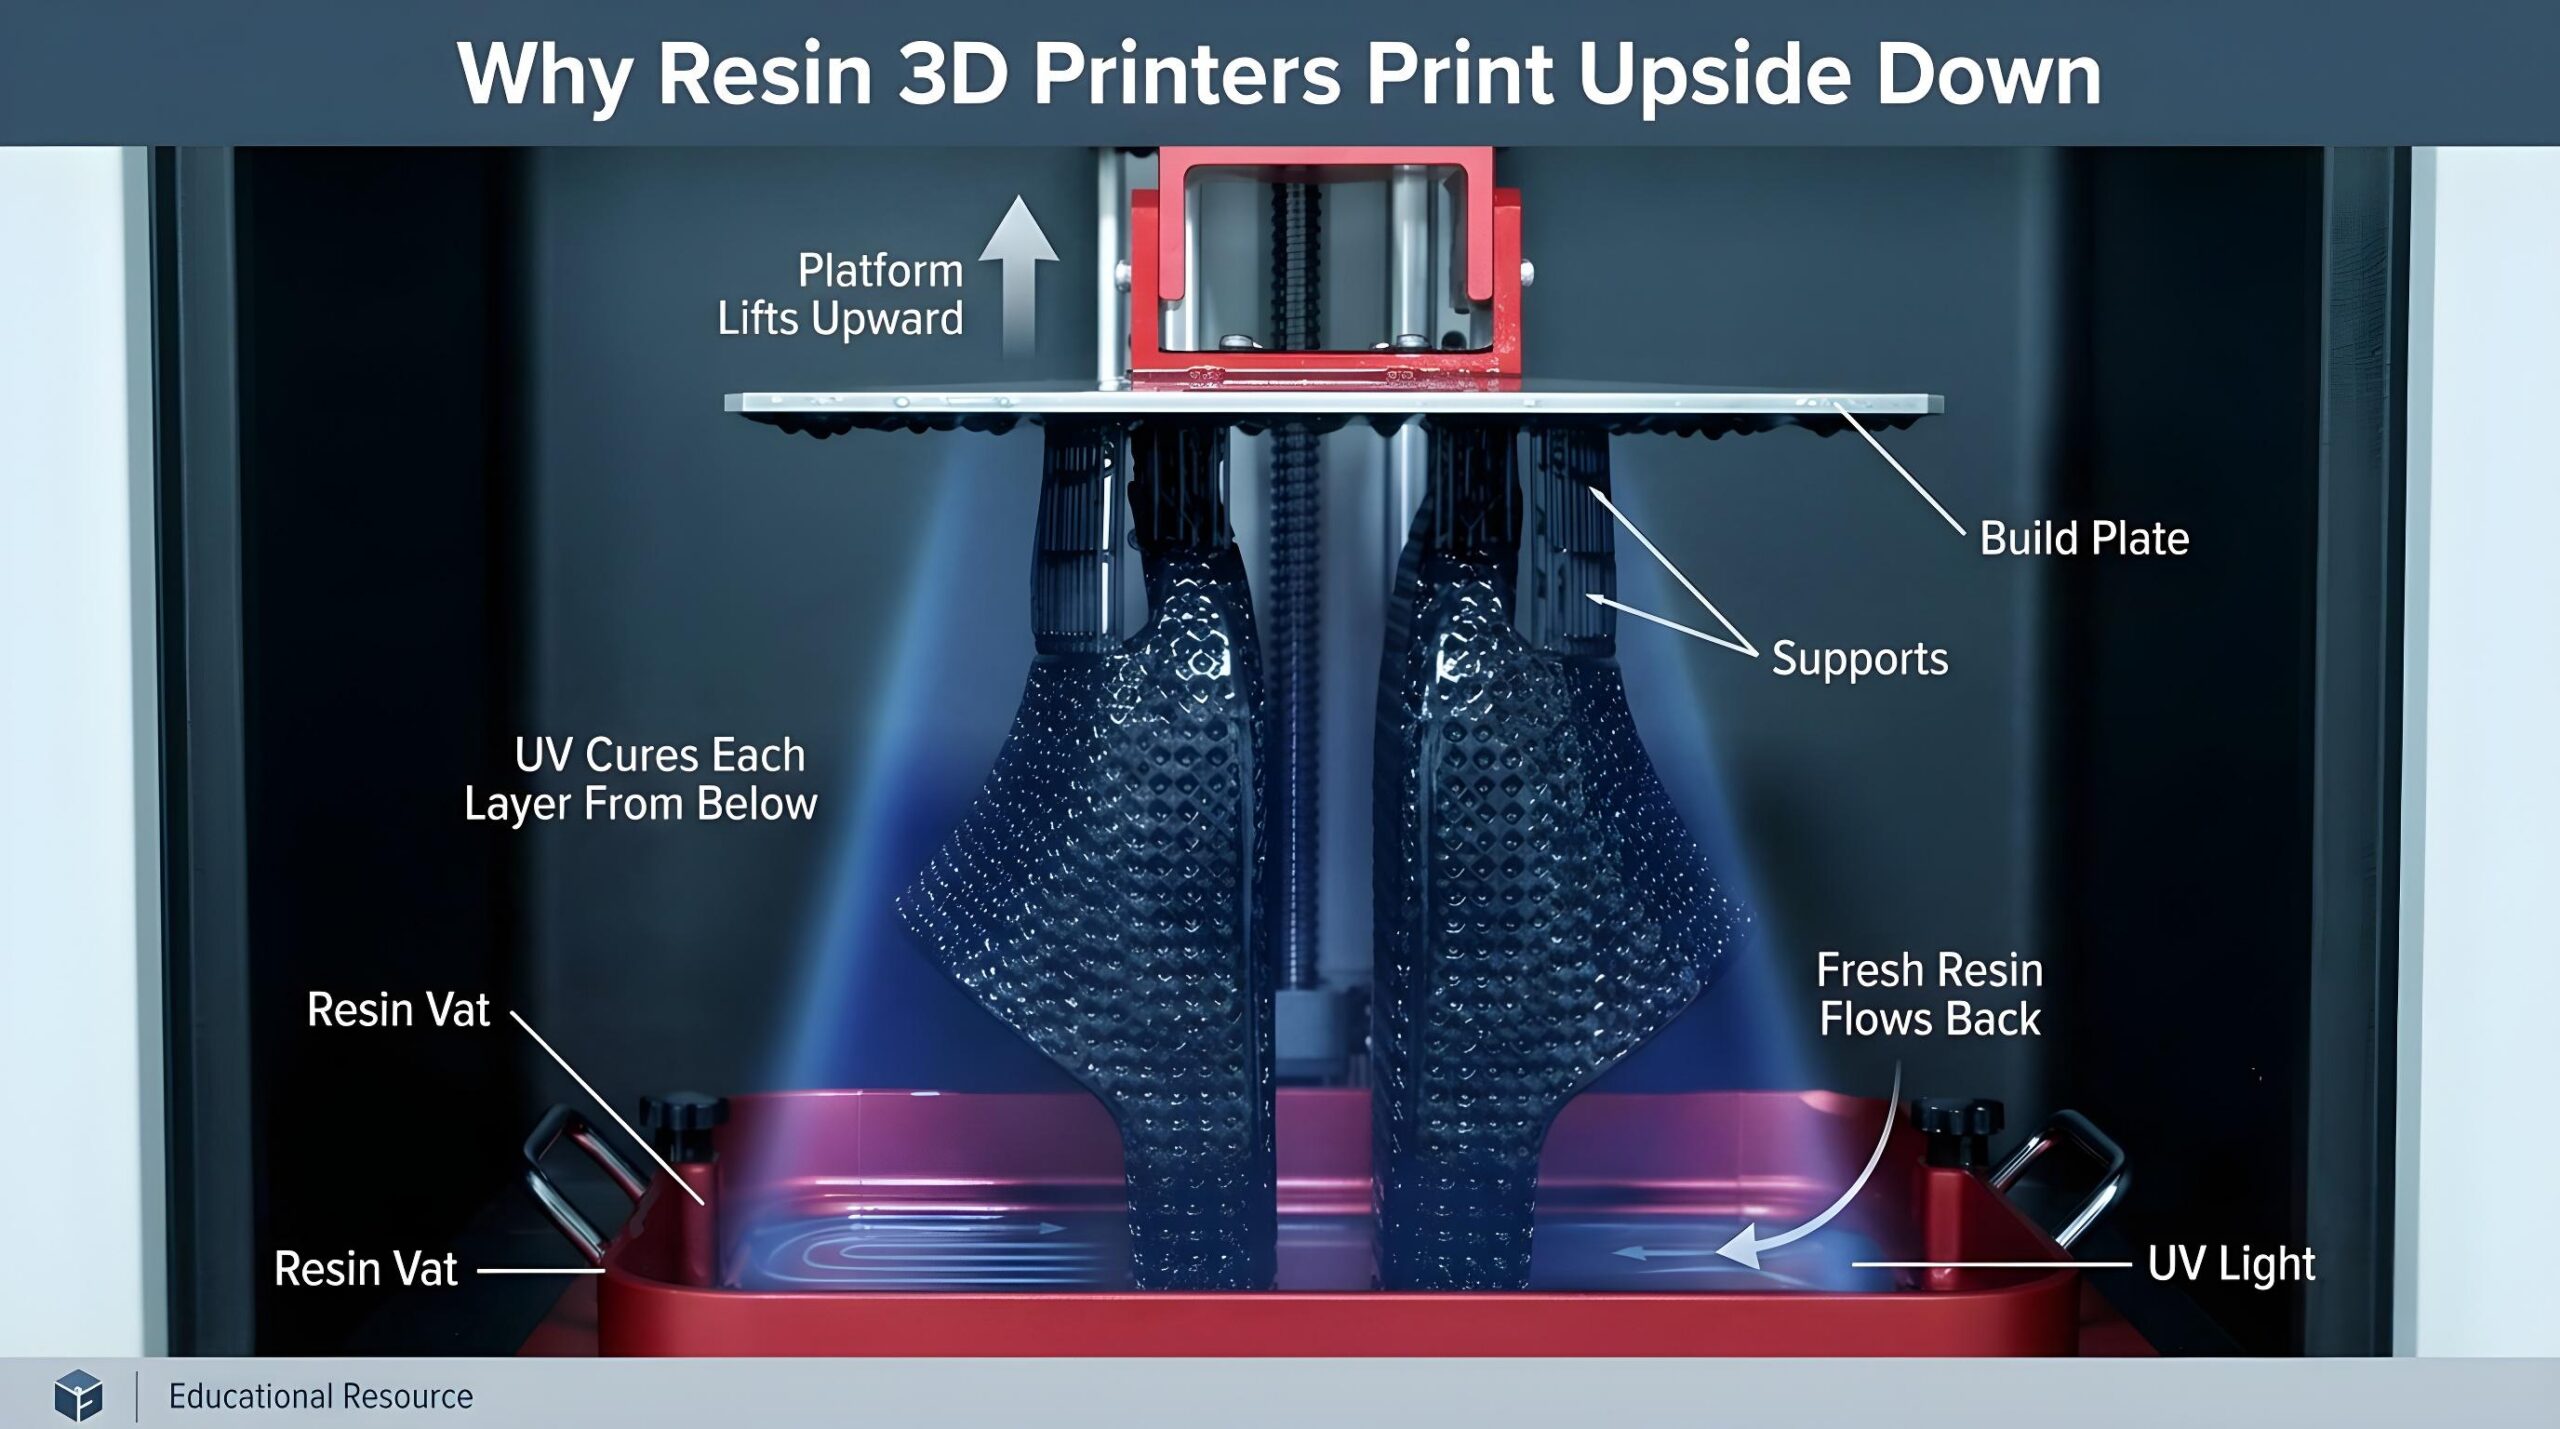
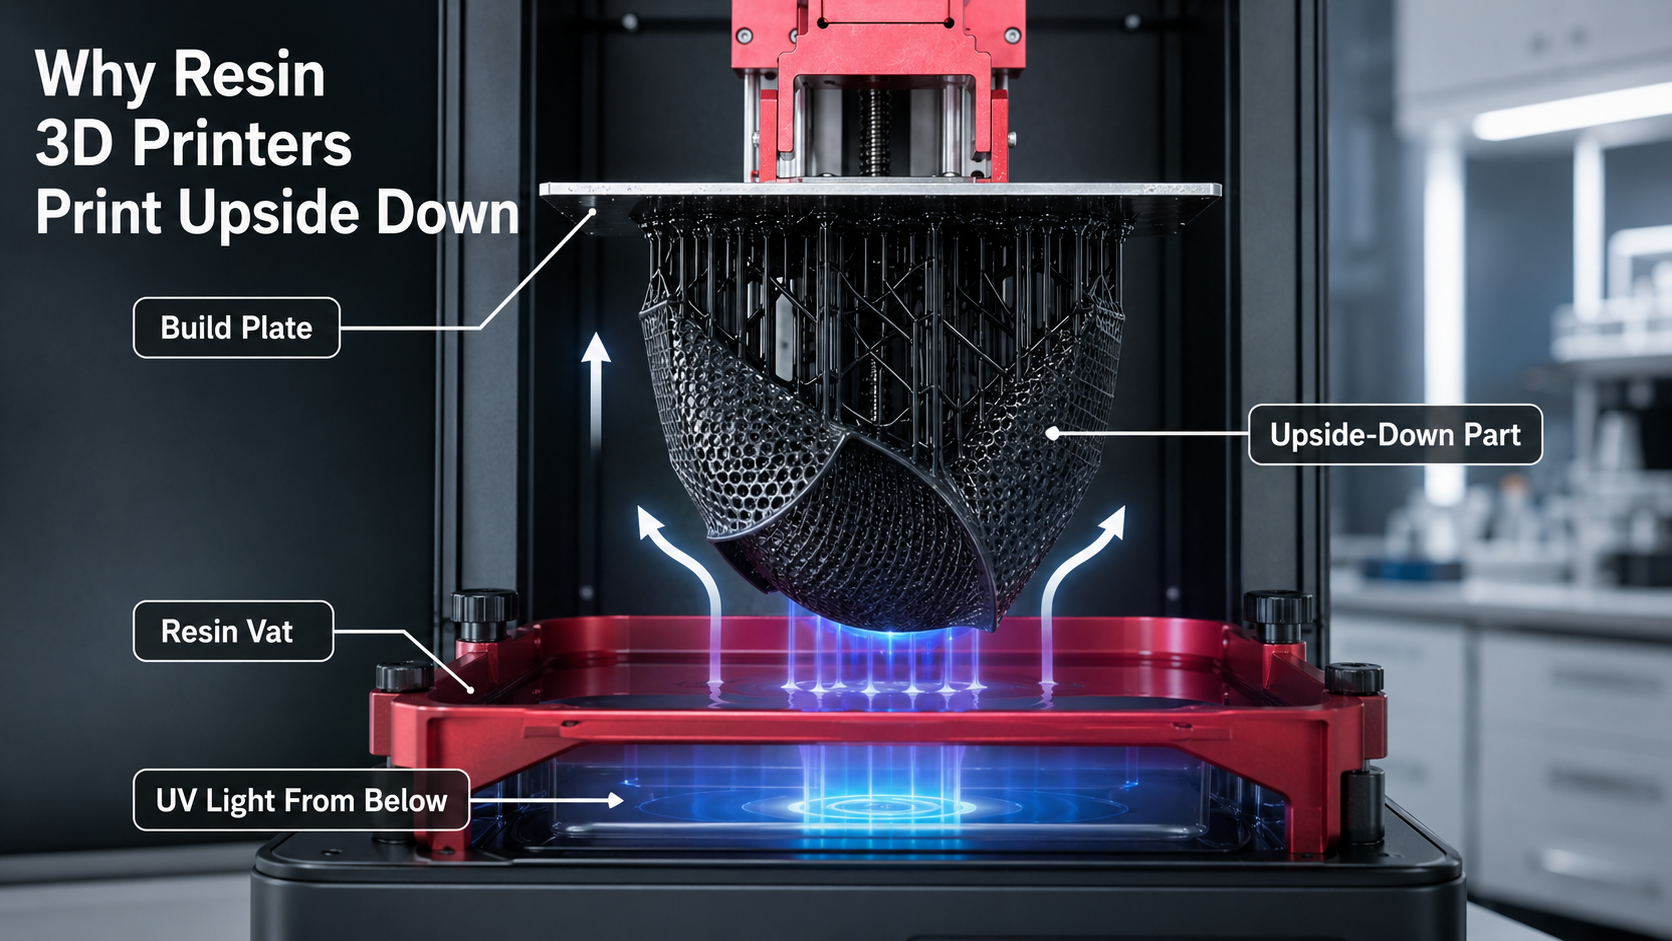
A 3D resin printer prints objects upside down because many resin printers use a bottom-up vat photopolymerization design. In this process, the build platform starts close to the transparent film at the bottom of the resin vat. UV light cures each layer from below, and the platform lifts upward after every layer. The printed part hangs from the build plate, so it appears upside down during printing. This design helps reduce resin volume requirements, keeps the optical path compact, and allows detailed layer-by-layer curing in a controlled resin vat. Vat photopolymerization builds objects layer by layer by curing liquid photopolymer resin with UV or laser light.
Introduction
When new users see a resin print hanging from the build platform, the first reaction is often: “Why is the object upside down?” For industrial users, dental labs and engineering teams, this is more than a curiosity. The upside-down build direction affects part orientation, support design, peel force, resin drainage, surface quality, dimensional consistency and post-processing.
For professional resin 3D printing, the question is not only why the printer works this way, but how to use this workflow correctly. A well-planned resin printing process can support detailed dental models, engineering prototypes, small-batch trial parts, flexible samples and visual models, depending on the resin, printer structure, exposure settings and post-curing process.
If you are comparing professional systems, Yidimu provides industrial resin 3D printer options and dental 3D printers for labs and clinics for different production workflows.
How Bottom-Up Resin Printing Works
Most professional resin 3D printers use a vat filled with liquid photopolymer resin. The bottom of the vat has a transparent film or window. Beneath that film is a light engine, such as an LCD, DLP or laser-based exposure system. The build platform lowers into the resin, leaving a very thin gap between the platform and the vat film.
The printer then cures one layer of resin at a time. After each exposure, the build platform lifts slightly. This separates the cured layer from the vat film and allows fresh resin to flow underneath the part. The next layer is then exposed and bonded to the previous layer.
This repeated movement creates the full object. Because the platform moves upward while the part is attached to it, the object hangs downward during printing. That is why the part looks upside down.
The general principle fits additive manufacturing: physical 3D geometries are built by successive addition of material, as described in ISO/ASTM terminology for additive manufacturing.
Why Do Resin Printers Use This Inverted Design?
The upside-down layout is not accidental. It solves several practical design problems.
First, it reduces the amount of resin needed in the vat. In a bottom-up system, the printer only needs enough resin to cover the build area and maintain stable material flow. This is useful for professional users who print with different resin types, including dental model resin, engineering resin, casting resin or flexible resin.
Second, it keeps the optical system fixed under the vat. The light source can project upward through a controlled optical path. This helps the machine expose each layer with consistent positioning, depending on the printer design and calibration.
Third, it makes the printer more compact. A top-down resin printer would need a deeper vat because the part moves down into the resin. A bottom-up printer allows the part to rise out of the resin gradually, which is more practical for many modern resin printer structures.
Fourth, it allows efficient layer separation. The printer can lift, peel, pause and return according to programmed settings. These parameters influence print reliability, especially for large cross-sections, dental arches, flat engineering parts and flexible resin samples.
Bottom-Up vs. Top-Down Resin Printing
| Feature | Bottom-Up Resin Printing | Top-Down Resin Printing |
|---|---|---|
| Build direction | Object hangs from the build platform and grows upward | Object is built downward into a resin vat |
| Resin requirement | Usually lower resin volume | Usually higher resin volume |
| Machine structure | More compact for many professional systems | Requires deeper resin tank |
| Layer separation | Each layer must release from the vat film | Less peel force from bottom film |
| Workflow concern | Orientation, support strength and peel force are critical | Resin level and vat depth are critical |
| Common professional use | Dental models, prototypes, small parts, detailed resin work | Specialized workflows and larger resin-volume systems |
For most professional buyers, bottom-up resin printing is common because it balances detail, machine size, resin handling and workflow efficiency. However, it also requires proper support strategy and orientation control.
Why the Print Does Not Fall Off
A resin print does not fall off because the first cured layers bond strongly to the build platform. During printing, the part must stay attached to the platform while each new layer separates from the vat film. This is why build plate leveling, bottom exposure, resin compatibility and support design are so important.
The first layers are usually exposed longer than normal layers. These bottom layers create a strong foundation between the print and the metal platform. After that, normal layer exposure continues according to the resin profile.
If bottom exposure is too weak, the model may detach. If it is too strong, removal after printing may become difficult or the base may deform. Professional users should avoid random exposure changes and should confirm parameters with the printer, resin, layer thickness and model geometry.
For users who need material guidance, Yidimu offers resin materials for professional workflows, including model, dental and application-specific resin options.
Why Supports Are Needed in Upside-Down Resin Printing
Supports are essential because the printed object is suspended from the build plate. Any island, overhang or unsupported feature may fail if it has nothing to attach to during layer formation.
In resin printing, supports do several jobs:
They anchor the model to the build plate.
They reduce the chance of floating or detached sections.
They help distribute peel force.
They protect detailed surfaces when orientation is planned correctly.
They allow resin to drain from hollow or concave areas.
For dental models, supports may be minimal depending on model orientation and base design. For engineering prototypes, lattice samples, flexible parts or thin wall structures, support planning can be more demanding. A part that looks simple in CAD may still need careful orientation in resin printing because every layer must survive exposure, separation and lifting.
How Orientation Affects Print Quality
The upside-down build method makes orientation one of the most important decisions in resin printing.
A flat part placed directly parallel to the vat film may create a large cross-sectional area. This can increase peel force and make failures more likely. Tilting the part can reduce the contact area per layer, improve resin flow and make supports easier to manage.
However, too much tilt can increase print height and print time. It can also move support marks onto visible or functional surfaces. The best orientation depends on part geometry, resin behavior, required surface quality and dimensional tolerance.
For production users, orientation should be treated as a process variable, not a random slicing choice. When a factory needs repeatable parts, the same model orientation, support settings, resin batch control, cleaning time and UV curing process should be documented.
Practical Workflow for Upside-Down Resin Printing
| Workflow Stage | What Happens | Why It Matters |
|---|---|---|
| Model preparation | CAD model is checked, repaired and scaled | Prevents holes, thin walls and unstable features |
| Orientation | Model is tilted or positioned for stable printing | Reduces peel force and improves resin drainage |
| Support generation | Supports are added to islands and critical features | Keeps the suspended part attached during printing |
| Slicing | Layers are generated based on layer thickness and exposure settings | Controls curing, detail and print time |
| Printing | Build platform lifts after each cured layer | Creates the upside-down hanging print |
| Washing | Excess resin is removed from the surface | Improves surface quality and handling safety |
| UV post-curing | Printed part is cured after cleaning | Helps improve stability depending on resin requirements |
| Inspection | Dimensions, surface and fit are checked | Confirms whether the workflow meets application needs |
NIOSH notes that vat photopolymerization parts typically undergo post-processing, often including chemical cleaning to remove excess resin and UV post-curing to make the finished item stronger and more stable.
For post-processing equipment planning, see Yidimu UV curing equipment for resin prints.
Orientation Checklist for Professional Users
Before printing, check these points:
Is the largest flat surface creating too much peel force?
Are visible surfaces protected from support marks?
Are all islands supported?
Can liquid resin drain from hollow areas?
Will the part be easy to remove from the build plate?
Does the orientation protect critical dimensions?
Does the resin require a specific cleaning or curing process?
Is the support contact strong enough for the part weight and peel force?
For dental applications, customers should confirm resin indication, post-curing process and local regulatory requirements before clinical or intraoral use.
Does Printing Upside Down Affect Accuracy?
Printing upside down does not automatically reduce accuracy. Accuracy depends on the printer structure, optical system, resin behavior, exposure settings, layer height, temperature control, support strategy, washing, curing and measurement method.
However, the inverted process can affect results when workflow control is poor. For example, a heavy part with weak supports may shift slightly during printing. A large flat surface may create strong peel forces. A hollow model without drainage may trap resin. Over-curing or under-curing may change feature detail.
For dental labs and factories, the practical question is not “Is upside-down printing accurate?” but “Is the whole workflow controlled enough for the intended application?” This includes printer calibration, resin selection, support design, cleaning, UV curing and inspection.
Yidimu’s dental 3D printing workflow and industrial 3D printing solutions pages can help users evaluate workflow requirements by application.
Why Resin Flow Matters
After each layer is cured and lifted, fresh resin must flow back into the gap before the next exposure. If resin flow is poor, the next layer may be incomplete, weak or distorted.
This matters more for:
large solid models
wide flat parts
dense dental model batches
flexible resin structures
deep concave parts
hollow shells without drainage
high-viscosity resin
Professional users should not only check exposure time. Lift speed, retract speed, wait time, resin viscosity, vat condition and model orientation can all affect print stability.
Common Mistakes to Avoid
Printing Large Flat Surfaces Parallel to the Vat Film
This can create high peel force and increase the chance of failure. A controlled tilt is often better.
Using Too Few Supports
A model may look stable on screen but fail during layer separation. Suspended resin printing requires supports that can handle repeated lifting forces.
Placing Support Marks on Critical Surfaces
Support marks can affect fit, appearance or function. Place supports on less critical surfaces where possible.
Ignoring Resin Drainage
Hollow models and concave parts need drainage planning. Trapped resin can affect cleaning, curing and long-term stability.
Using One Exposure Setting for Every Resin
Different resins may require different exposure, lift and post-curing settings. Customers should confirm resin parameters instead of assuming one profile fits all materials.
Skipping Post-Curing Control
UV curing time, temperature and part placement can influence final properties. Follow resin and equipment guidance.
Handling Resin Without Proper Protection
Liquid resin and post-processing chemicals should be handled carefully. NIOSH recommends following the safety data sheet, using appropriate eye protection when liquid splashing may occur, and using nitrile or other chemical-resistant gloves when appropriate.
Is Upside-Down Printing Better for Dental and Industrial Applications?
For many professional resin workflows, the bottom-up design is practical and efficient. Dental labs can print models, splints, guides or other dental-related parts depending on resin indication and workflow requirements. Factories can print engineering prototypes, appearance models, assembly samples, jigs, fixtures and small-batch trial parts depending on resin properties and accuracy needs.
The advantage is not simply that the printer prints upside down. The advantage comes from a controlled workflow: stable Z-axis movement, suitable light exposure, correct resin selection, reliable support generation, cleaning, UV curing and inspection.
For engineering sample evaluation before equipment purchase, Yidimu also provides a sample printing service.
FAQ
Why does a 3D resin printer print objects upside down?
Because many resin printers use a bottom-up vat photopolymerization process. The build platform starts near the transparent bottom of the resin vat, UV light cures each layer from below, and the platform lifts upward as the object forms.
Is upside-down resin printing normal?
Yes. It is a normal design for many resin 3D printers. The hanging part is not a problem if the build plate adhesion, support structure, exposure settings and resin workflow are properly controlled.
Why does the print stick to the build plate instead of the vat film?
The first layers are usually exposed longer so they bond strongly to the build plate. The printer then separates each newly cured layer from the vat film during lifting.
Do all resin 3D printers print upside down?
No. Many modern resin printers use a bottom-up design, but top-down resin printer designs also exist. Bottom-up systems are common because they can reduce resin volume and keep the machine structure more compact.
Does upside-down printing require more supports?
It often requires careful supports because the model is suspended during printing. The number of supports depends on part geometry, resin type, orientation and layer forces.
Can upside-down printing damage surface quality?
It can leave support marks if supports are placed on visible or functional surfaces. Good orientation and support placement help protect important surfaces.
Why do resin prints need washing and UV curing?
Washing removes uncured resin from the surface. UV post-curing helps the part reach a more stable final state depending on resin type and application requirements. NIOSH describes post-processing for vat photopolymerization as commonly involving chemical cleaning and UV post-curing.
Is this process suitable for dental models?
It can be suitable for dental models when the printer, resin, slicing parameters, cleaning, curing and inspection workflow match the application. For clinical or intraoral use, customers should confirm resin indication, post-curing process and local regulatory requirements.
Conclusion
A 3D resin printer prints objects upside down because the bottom-up vat photopolymerization process cures resin from below while the build platform lifts the part upward layer by layer. This design helps reduce resin volume, supports compact machine construction and enables detailed resin printing workflows. For professional users, the key is not the upside-down appearance itself, but how orientation, supports, resin flow, exposure, cleaning and UV curing are controlled.
If you are planning a resin 3D printing workflow for dental models, engineering prototypes, flexible parts, factory samples or small-batch production, contact Yidimu with your model size, resin requirement, application, expected workflow and production or sample-making needs. The Yidimu team can help review printer selection, resin matching and process planning based on your actual use case through printer selection support.