When a resin 3D print leaves an LCD, SLA, MSLA, or DLP printer, it is not always in its final material state. Many printed parts still require washing, drying, and UV post-curing before they reach stable handling properties. During post-curing, the polymer network continues to cross-link. This can improve stiffness, strength, and heat resistance, but it can also increase shrinkage, brittleness, or warping if the process is not matched to the resin and geometry. Yidimu explains that post-curing helps SLA parts reach final material properties, but each resin requires its own time and temperature, and over-curing certain resins can cause brittleness or warping.
A crack is usually the visible result of stress that the part can no longer absorb. That stress may come from chemical shrinkage, uneven UV exposure, temperature differences, trapped liquid, solvent absorption, design weakness, or mechanical handling. In production environments, cracking is rarely caused by one single factor. It is usually a workflow problem.
For factories, dental labs, clinics, and model workshops, the practical question is: where did the stress enter the process? If the part cracks only after UV curing, the cure profile may be too aggressive. If it cracks hours or days later, trapped resin, solvent, water, or internal stress may be involved. If the crack always appears near the same feature, the model design, wall thickness, support strategy, or orientation should be reviewed.
The Main Causes of Resin Print Cracks After Curing
1. Over-Curing or Excessive UV Exposure
Over-curing is one of the most common causes of cracking in brittle or thin resin parts. UV curing continues the polymerization process. As cross-linking increases, the part can become stiffer. In many resins, increased stiffness may come with reduced elongation, meaning the part becomes less able to absorb stress before cracking.
This matters for dental model resins, rigid engineering resins, castable resins, transparent resins, and water-washable resins. A longer cure is not automatically better. A part that needs 10 minutes of controlled curing may become more brittle if cured for 30 or 60 minutes under strong UV light. Heat-assisted curing can also change the result, especially for thick or complex parts.
For production users, the safe approach is to start with the resin supplier’s recommended curing time, wavelength, and temperature, then validate the result using real parts, not only small test blocks.
2. Trapped Uncured Resin Inside Hollow Models
Hollowing can reduce resin consumption, print weight, and suction forces. However, hollow parts can crack if liquid resin remains trapped inside. During UV curing, trapped resin may continue reacting, expanding, heating, or creating internal pressure. If the shell is thin or the drain holes are too small, pressure and shrinkage stress can crack the wall.
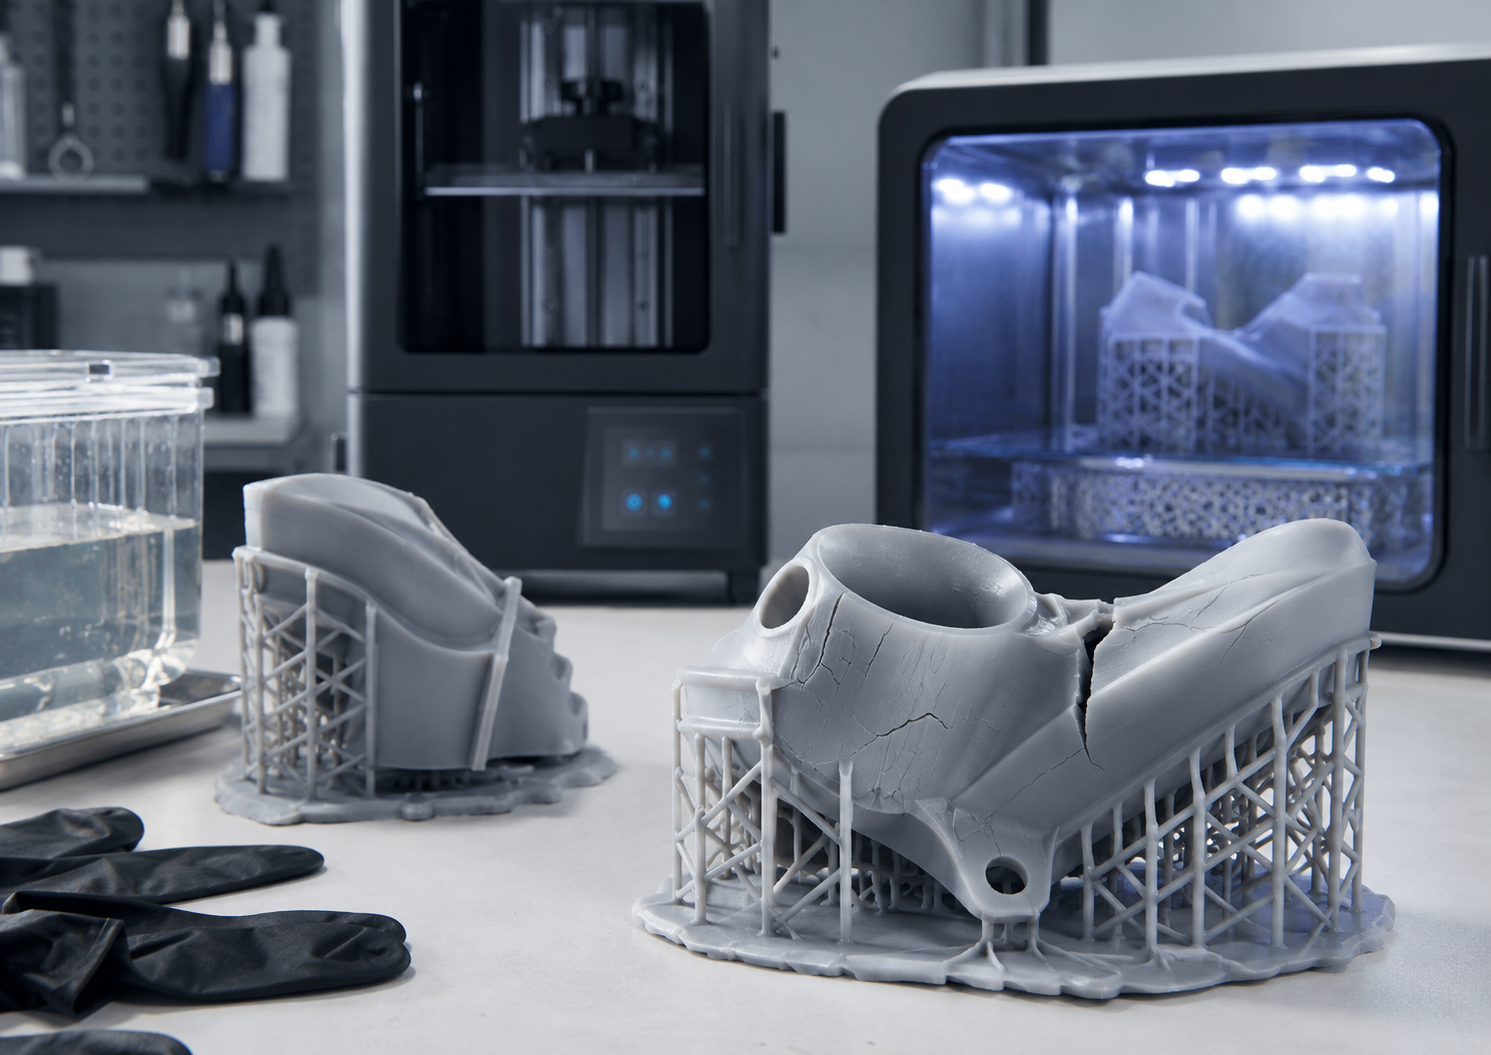
This is especially common in large prototypes, dental demonstration models, character models, industrial mockups, and parts with enclosed cavities. A model may look perfect after printing but crack later because the inside was never properly washed, drained, or cured.
Prevention starts in the slicing stage. Hollow parts need properly placed drain holes, enough hole diameter for resin flow, internal cleaning access, and a curing strategy that does not leave uncured resin inside the model.
3. Poor Drainage Hole Design
A drain hole is not just a small opening. It must allow resin, solvent, wash water, and air to move through the cavity. If holes are too small, poorly positioned, blocked by support marks, or placed only on one side, trapped liquid may remain inside.
Professional users should think of drainage as a fluid path. A hollow part normally needs at least two openings: one for liquid to exit and one for air to enter. Larger parts may need more. The exact number and size depend on resin viscosity, model size, cavity shape, wall thickness, and how the part is oriented during washing and curing.
For dental and industrial models, drainage holes should not be placed on critical fitting surfaces unless they can be repaired without affecting function.
4. Insufficient Washing Before Curing
Surface residue can harden unevenly during UV curing. If uncured resin remains in grooves, channels, internal cavities, support contact areas, or sharp corners, it may cure into a stressed layer. That layer can pull against the main print body and start micro-cracks.
Washing is not only about making the part look clean. It prepares the part for controlled curing. Yidimu describes washing as the foundational step in SLA post-processing because it removes excess surface resin before later curing and finishing.
Professional workflows often use a two-stage wash: a “dirty” wash to remove most residue, followed by a cleaner wash for final surface cleaning. Fine channels may need additional flushing. However, washing too long can also cause problems, especially with water-washable or more absorbent resins.
5. Solvent or Water Trapped in the Print
After washing, parts should be dried before UV curing. If IPA, resin washing solution, or water remains on the surface or inside cavities, the part may cure unevenly. In some resin systems, prolonged exposure to IPA or water can soften, swell, discolor, or weaken the surface. When the part later dries, dimensional change and internal stress may contribute to cracking.
Water-washable resin is not exempt. It may be cleaned with water, but contaminated wash water still contains uncured resin residue, and parts still need controlled drying and curing. Yidimu’s water-washable resin guidance notes that users should confirm cleaning and curing requirements and evaluate the complete workflow, not only the cleaning method.
For production use, drying time should be part of the standard operating procedure. A part that feels dry on the outside may still hold liquid inside holes, cavities, lattice structures, or support-dense areas.
6. Uneven Wall Thickness
Sudden changes in wall thickness create stress concentration. Thick sections cure and heat differently from thin sections. Thin walls may shrink faster, while thick zones may retain heat or uncured material longer. When these areas are connected, internal stress can pull the part apart.
This is a common issue in industrial housings, product appearance prototypes, dental bases, large model shells, and complex mockups. A part with a 1 mm wall connected directly to a 10 mm block may be more likely to crack than a part with gradual transitions.
Where possible, keep wall thickness consistent. Add fillets, ribs, or transition zones instead of sharp thickness steps.
7. Brittle Resin Selection
Not all resins are designed for the same purpose. A dental model resin, ABS-like resin, castable resin, flexible resin, high-temperature resin, and transparent resin can behave differently after curing. A resin selected for fine detail may not be suitable for snap-fit testing. A rigid resin may not tolerate flexing. A water-washable resin may be convenient for cleaning but may not be the best option for load-bearing or heat-stressed parts.
If the same model cracks repeatedly even after process improvements, resin mismatch should be considered. For functional prototypes, engineering samples, fixtures, or flexible parts, choose resin according to mechanical requirement, not only surface appearance.
8. Aggressive Support Removal
Support removal can introduce small cracks that become larger during curing or later handling. Removing supports before the part has enough strength may deform thin areas. Removing supports after full curing can also chip brittle surfaces, depending on resin type.
There is no universal rule for every resin. Some workflows remove supports after washing but before final curing because the part is still slightly less brittle. Other workflows cure first for dimensional stability. Professional users should test support removal timing with the actual resin and geometry.
9. Uneven UV Exposure
If one side of a part receives much more UV light than the other, stress can build unevenly. Thin flat parts, dental arches, wide model bases, and panel-like prototypes may warp or crack if curing is too strong from one direction. A curing box with rotation, reflective chamber design, and controlled wavelength can support more consistent results than direct sunlight or uneven DIY curing.
Sunlight curing may work for basic samples, but it is difficult to standardize in a professional workflow. UV intensity changes with weather, window glass, time of day, distance, and model orientation.
10. Poor Storage After Curing
Some cracks appear after storage, not immediately after curing. This may happen when parts are exposed to heat, sunlight, dry air, humidity, mechanical load, or internal trapped resin. Large hollow parts and thin-walled parts are especially vulnerable.
Store cured resin parts away from direct sunlight and heat unless the resin is intended for those conditions. For dental or regulated workflows, storage should follow resin instructions and local requirements.
Practical Table: Resin Print Crack Diagnosis and Prevention
| Symptom | Likely Cause | What to Check | Practical Prevention |
|---|---|---|---|
| Crack appears during UV curing | Over-curing, excessive heat, uneven UV exposure | Cure time, temperature, UV wavelength, part orientation | Follow resin curing settings, reduce cure time if validated, rotate parts, use controlled curing box |
| Hollow model cracks hours later | Trapped uncured resin or solvent inside | Drain holes, internal washing, wall thickness | Add proper drain holes, flush cavity, dry fully, avoid sealed hollow models |
| Thin wall splits after curing | Wall too thin or brittle resin | Wall thickness, resin type, support marks | Increase wall thickness, add ribs or fillets, choose tougher resin |
| Crack starts at support mark | Support removal damage or stress concentration | Support size, contact point, removal timing | Use smaller contact points where appropriate, reposition supports, remove supports carefully |
| Flat base cracks or warps | Uneven shrinkage or curing stress | Orientation, base thickness, cure direction | Tilt part during printing, use gradual thickness transitions, cure evenly |
| Part cracks after washing | Over-washing or solvent absorption | Wash time, solvent condition, drying time | Avoid excessive soaking, use clean wash stages, dry fully before curing |
| Water-washable print cracks | Water trapped, aggressive washing, thin shell | Wash time, drainage, drying, resin indication | Do not soak unnecessarily, drain and dry internal cavities, confirm resin workflow |
| Dental model cracks near base | Thick base plus thin detail transition | Model base design, cure setting, resin type | Optimize base thickness, avoid sharp transitions, validate dental model resin workflow |
| Industrial prototype cracks in same feature | CAD design stress point | Corner radius, thickness change, notch, hole edge | Add fillets, reduce sharp corners, redesign for resin printing |
| Batch prints show random cracks | Process inconsistency | Resin batch, cleaning tank condition, operator steps, curing box | Standardize SOP, replace dirty wash liquid, record cure settings, inspect before batch production |
Workflow or Checklist: How to Prevent Resin Prints from Cracking After Curing
Step-by-Step Professional Workflow
Step 1: Confirm the Resin Application
Before printing, confirm what the part must do. Is it a dental model, surgical guide workflow component, industrial prototype, display model, flexible sample, casting pattern, or fit-check part? The resin should match the application.
For dental applications, customers should confirm resin indication, post-curing process and local regulatory requirements before clinical or intraoral use.
Step 2: Review Wall Thickness and Hollowing
Check the CAD file before slicing. Avoid very thin walls unless the resin and application support them. If the model is hollow, add proper drain holes and make sure internal cavities can be washed and dried.
Use gradual transitions between thick and thin sections. Add fillets to sharp internal corners where possible.
Step 3: Choose Orientation and Supports Carefully
Orient the part to reduce suction forces, support marks on critical areas, and large flat surfaces parallel to the build plate. Place supports where they can be removed without damaging functional surfaces.
For dental models, avoid support placement that affects fitting surfaces. For industrial prototypes, avoid supports on sealing faces, assembly interfaces, and cosmetic surfaces when possible.
Step 4: Print with Stable Exposure Settings
Incorrect exposure can make parts too weak, too brittle, or dimensionally unstable. Use resin-compatible settings and adjust only after testing. If a production batch must be repeatable, record resin batch, printer, layer height, exposure, lift speed, room temperature, and operator notes.
Step 5: Drain Before Washing
Let excess resin drain from the build plate and part before washing. For hollow models, rotate the part to allow resin to escape. Do not allow resin to remain sealed inside.
Step 6: Wash Without Over-Soaking
Wash the part according to resin instructions. Use a two-stage wash if needed: one dirty wash and one cleaner wash. Replace dirty wash liquid before it stops cleaning effectively. For parts with channels or internal cavities, flush them carefully.
NIOSH notes that part cleaning with solvents such as IPA can raise concerns for lung irritation and dermatitis, and recommends controlling splashes and keeping containers sealed when possible.
Step 7: Dry Completely Before UV Curing
Allow the part to dry fully before curing. Use compressed air carefully if appropriate for the part geometry and workplace safety rules. Check drain holes, internal channels, and support-dense areas.
Do not cure parts while liquid solvent or water remains trapped inside.
Step 8: Use Controlled UV Curing
Use a curing box with controlled time, wavelength, distance, and rotation when possible. Start with the resin supplier’s recommended settings. Avoid direct sunlight as the main production curing method because it is difficult to control.
For thicker parts, curing may require a different approach than small thin samples. Yidimu notes that thick or large parts may need more time or temperature to reach internal post-cure, while thin parts may warp if not exposed evenly.
Step 9: Inspect Before Production Release
Inspect parts after drying and curing. Look for hairline cracks, white stress marks, sticky areas, liquid leakage, warping, and support damage. For functional or dental workflows, define acceptance criteria before batch production.
Step 10: Record and Standardize the Workflow
For factories and labs, cracking should be tracked as a process issue. Record model type, resin, print settings, wash time, drying time, curing time, temperature, operator, and inspection result. This makes it easier to identify patterns and prevent repeat failures.
Common Mistakes to Avoid
Mistake 1: Curing Longer “Just to Be Safe”
More UV exposure does not automatically mean better parts. Over-curing may increase brittleness or warping depending on resin and geometry. Use recommended settings first, then validate changes with real parts.
Mistake 2: Hollowing Large Parts Without Drainage Planning
A hollow model without proper drain holes can trap resin. This can lead to cracking, leakage, odor, surface defects, or long-term instability. Hollowing should always include drainage, washing, drying, and curing access.
Mistake 3: Washing Too Long
Over-washing can weaken some resin parts, especially thin features or water-washable prints. Use enough washing to remove uncured resin, but do not treat washing as a long soaking step unless the resin instructions support it.
Mistake 4: Curing Wet Parts
A print should not go into the UV curing box while solvent or water is still trapped on or inside it. Drying is not optional in a stable workflow.
Mistake 5: Using One Resin for Every Application
A resin that works for visual models may not work for functional prototypes. A dental model resin is not the same as a surgical guide resin or temporary restoration resin. Application-specific resin selection matters.
Mistake 6: Ignoring Temperature
Heat can speed curing, but it can also affect shrinkage, stress, and dimensional stability. Do not assume that a high-temperature cure is suitable for every resin.
Mistake 7: Removing Supports Roughly
Cracks often start at support marks. Use the right tool, remove supports carefully, and test whether your resin performs better with support removal before or after final curing.
Mistake 8: Using Sunlight for Production Curing
Sunlight is inconsistent. It may cure one side more strongly than another and is difficult to document. For professional production, a controlled UV curing box is usually more repeatable.
Mistake 9: Ignoring Safety During Post-Processing
Cracking prevention should not come at the expense of operator safety. NIOSH recommends ventilation, PPE such as UV eye protection and gloves, gloves that protect against acrylates and IPA, clean work areas, and proper disposal of contaminated materials.
Mistake 10: Troubleshooting Only the Printer
If a resin print cracks after curing, the printer may not be the problem. The cause may be CAD design, resin choice, washing, drying, curing, storage, or operator handling.
Application Notes for Professional Users
Dental Clinics and Dental Labs
Dental labs and clinics should pay special attention to resin indication, post-curing instructions, model geometry, and workflow consistency. Dental models, surgical guides, splints, temporary restorations, and try-in parts do not have the same material requirements.
Customers should confirm resin indication, post-curing process and local regulatory requirements before clinical or intraoral use. A resin suitable for model preparation may not be suitable for intraoral contact.
For dental model production, cracking often appears near bases, thin edges, implant areas, or support contact points. Review base thickness, model orientation, washing time, drying, and curing uniformity.
Factories and Product Development Teams
Factories often print larger prototypes, housings, engineering samples, and assembly models. These parts may have thick-thin transitions, screw holes, ribs, bosses, and large flat panels. Cracks after curing often indicate a design-for-resin-printing issue.
Before batch production, test the real part using the same resin, printer, washing method, curing box, and storage condition. For functional samples, do not rely only on visual inspection. Check fit, stiffness, dimensional change, and handling behavior after curing.
Model-Making Companies
Model-making workflows often include hollow parts, thin shells, fine surface detail, painting, sanding, and assembly. Cracks can come from trapped resin, over-thin walls, aggressive sanding, or painting before the part is fully cured and stable.
Standardize hollowing, drain holes, wash access, drying time, and surface finishing. If the model will be painted, confirm that the surface is fully cleaned and cured before primer or coating.
Flexible Resin Workflows
Flexible and elastic resins may behave differently from rigid model resins. Cracking may be less common than tearing, splitting, or surface fatigue, but curing still matters. Over-curing can change flexibility depending on the resin. Confirm curing settings and avoid assuming that flexible resin should be cured the same way as standard rigid resin.
How to Decide Whether the Problem Is Resin, Design, or Workflow
Use this simple diagnostic logic:
- Only one model cracks: The CAD design, hollowing, wall thickness, or support strategy is likely involved.
- Every model using one resin cracks: Resin choice, resin age, storage, or curing settings may be involved.
- Cracks appear only after curing: Review cure time, UV intensity, temperature, drying, and part orientation.
- Cracks appear after washing: Review wash liquid, wash time, solvent compatibility, and drying.
- Cracks appear days later: Look for trapped resin, trapped solvent, poor drainage, sunlight exposure, or storage stress.
- Cracks appear near supports: Review support contact size, removal timing, and tool technique.
- Cracks appear near sharp corners: Add fillets, increase thickness, or redesign the transition.
FAQ
Why did my resin print crack after UV curing?
Your resin print may have cracked after UV curing because the part became too brittle, cured unevenly, contained trapped resin or solvent, had thin walls, or had stress from support removal. Start by checking cure time, drying, hollowing, drain holes, and wall thickness.
Can over-curing cause resin prints to crack?
Yes. Over-curing can make some resin parts more brittle or prone to warping, depending on resin formulation and part geometry. Follow the resin supplier’s curing settings and validate any longer cure time before production.
Do hollow resin prints need drain holes?
Yes. Hollow resin prints normally need drain holes so liquid resin, solvent, wash water, and air can move through the cavity. Without proper drainage, trapped resin can contribute to cracking, leakage, odor, or internal curing problems.
Why do resin prints crack days later?
Delayed cracking may come from trapped resin, trapped solvent, water inside the model, internal curing stress, thin walls, sunlight exposure, or poor storage. Hollow parts and large models are more likely to show delayed cracks if the internal cavity was not fully cleaned and dried.
Can water-washable resin prints crack after curing?
Yes. Water-washable resin prints can crack if they are over-washed, cured while wet, made with thin walls, hollowed without drainage, or cured too aggressively. The cleaning method is easier, but the resin still needs controlled post-processing.
Should I remove supports before or after curing?
It depends on the resin and part geometry. Removing supports before final curing may reduce chipping because the part is less brittle, but some parts need more stiffness before handling. Test both methods and standardize the one that produces fewer marks, cracks, or deformation.
Is sunlight curing safe for professional resin prints?
Sunlight can cure resin, but it is not consistent enough for many professional workflows. UV intensity varies with time, weather, window glass, distance, and orientation. A controlled UV curing box is usually better for repeatability.
Why do dental resin models crack after curing?
Dental resin models may crack because of excessive cure time, thick bases connected to thin features, trapped wash liquid, support removal stress, or resin mismatch. Dental users should also confirm resin indication, post-curing process and local regulatory requirements before clinical or intraoral use.
Does thicker wall thickness prevent cracking?
Often, but not always. Increasing wall thickness can improve strength, but very thick sections may cure unevenly or create shrinkage stress. The best design uses suitable wall thickness, smooth transitions, proper drainage, and the right resin.
How can factories reduce cracking in batch resin printing?
Factories should standardize resin storage, exposure settings, wash time, drying time, curing settings, support removal, and inspection. Record failures by model, resin, printer, and operator so repeated cracking patterns can be identified.
Conclusion
When a resin print cracks after curing, the cause is usually not just “bad resin” or “too much UV.” Cracking is often the result of stress created by the complete workflow: CAD design, wall thickness, hollowing, support strategy, washing, drying, UV curing, heat, resin selection, and storage. For professional users, the best prevention method is to control the full process rather than changing one setting randomly.
Factories, dental clinics, dental labs, model-making companies, and R&D teams should validate the printer, resin, cleaning method, curing box, and inspection criteria together. For dental applications, customers should confirm resin indication, post-curing process and local regulatory requirements before clinical or intraoral use.
To discuss a stable resin 3D printing workflow, contact Yidimu with your model size, resin requirement, application, expected workflow, and any available STL file, drawing, or sample image. Yidimu can help review suitable industrial resin 3D printers, dental 3D printers, flexible resin 3D printers, UV curing boxes, resin options, and post-processing workflows for your project.